

A software showdown – it’s Corel Painter vs. Photoshop. The strengths, weaknesses, and differences between these two popular digital painting tools.
Corel Painter. Adobe Photoshop. Two very different programs with different tools and different painting processes.
However, despite their differences, lovely paintings can be created in both of these programs.
Digital artists may favor one over the other, or, like me use a mix of both Photoshop and Painter. The purpose of this article is not to declare one the outright champion, but to help you make a decision about which you’ll prefer for your needs.
One thing is certain, though – the statement, “You can do the same thing in either program” isn’t exactly true.
Corel Painter vs. Photoshop: Overview

It is true that you can paint in both programs, and, depending on how you want to work, how much you want to learn, and how much you want to budget for software, you’ll find a solution that works for you.
Personally, I wouldn’t give up my Corel Painter or my Photoshop!
As a professional digital artist, I use Corel Painter for drawing and painting, and Adobe Photoshop for photo retouching, image adjustments, and making composites. I do not feel inconvenienced moving from one program to the other.
In my opinion, the process of painting in Adobe Photoshop is more of an imaging experience while with Corel Painter you get more of an organic painting experience.

Photoshop painters incorporate layers, opacity adjustments, masks, image adjustments, blending modes, effects AND brushes.
Painter artists occasionally use layers, but spend most of the time painting, blending and working with specialty brushes.
Composition
In either case, the first step in painting is generally creating the composition.
Many times artists will combine multiple images in order to come up with the perfect composition. In my opinion, Photoshop’s cut and paste technology is faster and smoother than Painter’s, but Painter’s ability to resource multiple clone sources from a single canvas using its extensive range of creative tools like paper texture, flow maps and literally hundreds of brush looks offers more artistic options.


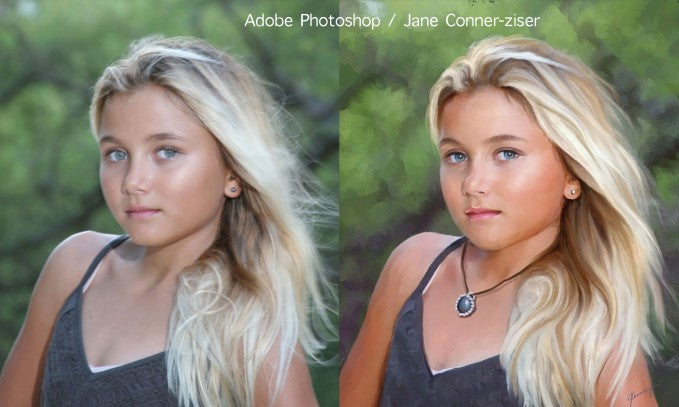
The first image above is a typical image composition that an artist might create for a painting using Photoshop. It was created in just minutes using layers, masks and adjustments. At this point it is ready to become a painting and is a great way to begin when an artist wants to keep most of the detail of the original image. This pre-composition lends itself well to the classic photo realistic styles of paintings that are popular products of portrait studios.
The second image above was pre-composed in Painter as two versions, the background and the background with the subject.
The Background file was Quick Cloned (duplicated and cleared to a white canvas) automatically assigning the original background as a Clone Source (reference image). The additional file containing the subject was opened as a second Clone Source option. The composition was laid out on the blank canvas using two chalk variants and a Soft Cloner on Basic Paper to create a classic chalk style of painting.
The composition and under painting are simultaneously created in this example. The reason for using the two source images is that it allows the artist to “erase”, ghost in or work the background separately from the subject.
Once the composition is completed the next step is to arrive at an Under Painting stage. This means that “paint” is applied to everything in a loose general manner. Under paintings can be created by hand, as in the Painter sample above or by using automated effects. When backgrounds are complicated many artists take the shortcut of automating the under painting.
Painter vs. Photoshop Case Study: River Scene
Let’s set up a Corel Painter vs. Photoshop challenge by looking at a few options in Photoshop and Painter using this image of a river scene that has been pre adjusted in Photoshop using image adjustments and splashes of accent color.

First, in Photoshop there are several automated filter effects to choose from, or one can choose a Smart Blur to get rid of photo pixel detail and bring the image into the realm of paint. The filters are applied globally and provide a painterly look to the photograph upon which the artist can apply personal touches, accent colors and additional detail.
In my opinion, there are a few artistic filter effects that look “real” but many that are distinctively digital in appearance so depending on the style of painting you want to work with, please experiment and choose the ones that are appealing to you.

Painter has an Auto Painting palette from which an artist can choose to use Smart Stroke Painting at Smart Settings. Choosing this option automatically provides a Brush Category with variants preset to work in this mode but almost any brush variant may be used, including blenders.
The Smart Auto Painting not only applies brush strokes globally, it also reads the contrasts of shapes and colors and tries to contour objects, starting with large brushes, pausing frequently to shift brush size and finishing with small ones:

In comparison, Photoshop’s auto under painting options are effective. Painter’s auto under painting is also effective, offers artists a wider range of artistic options, and looks more like natural media.
Brushes
When the under painting is complete the next step in painting is refining the shapes of important compositional objects, adding color and contrast and finishing up with details and decorations. This means brushes and since Painter has a much longer history creating organic feeling brushes, Painter has a lot more to offer here. Corel’s particular strength in my opinion is the Blender Category.
Painter’s blenders really integrate different colors together like real media. Photoshop’s blending behaves similarly to its Smudge Tool, which is similar to Corel’s Smear Variant in the Blender Category. It’s a good option but only one of many blending looks that Corel Painter offers.


Corel’s extensive Brush Library offers both traditional and digital styles of working with color. Some brushes apply color. Some brushes blend color. Some brushes move existing color around. Here are just a few:

Photoshop also has a lot of brushes – and you can even make your own. There are two options for using the brushes in Photoshop, the Brush Tool and the Mixer Brush Tool. The Brush Tool options provide ways of applying color. The Mixer Brush Tool options offer ways of applying color and then blending it.

During the painting process it sometimes becomes necessary to rebalance the values in the painting. Some areas get over painted, sometimes colors need to be altered and sometimes one area gets too dark or too light. Both programs offer the ability to Dodge and Burn and alter colors but it’s my experience that Adobe Photoshop does this faster and with more control and more accuracy.
It’s not unusual for me to pop a painting in progress into Photoshop for some light painting using Screen and Multiply adjustment layers with masks or adding specific colors using the Brush Tool in Color mode.
I can create paintings in both programs. It’s my belief that an artist is going to be able to find a way to paint using whatever is available – leaves tied to sticks, pieces of charcoal, Adobe Photoshop or Corel Painter.

I have a lot of painting friends! Most of them use Corel Painter but some of them are strong believers in Photoshop – and they produce masterful work! Sometimes the reason they use Photoshop to paint is that they don’t like going from one program to the other.
Some of them say they don’t use a lot of brushes so they can get what they need from Photoshop. Some of them say they don’t want to purchase two software programs. And some of them say that they like painting a little, cutting and pasting a little, retouching a little, working with Groups and they like working randomly.
I and my Corel Painter-loving friends are passionate about the organic intuitive way we get to paint in Painter and love the wide variety of brush styles, papers, flow maps and color mixing abilities that we can pick and choose from depending on what we want to do. We enjoy not having to digitally manage our painting, change options frequently and feel like we are painting in a software program. I feel freer in Corel Painter. I paint faster in it as well.
My Photoshop painting files contain many layers. My Painter files contain no layers but I usually save the paintings in stages ending up with 3-4 progressive files.
Results
Here are two completed paintings; one was created in Adobe Photoshop, the other in Corel Painter.
![]()
I’m pleased with both of the paintings.
I think you can see that the Photoshop sample is “chunkier” and more opaque looking whereas the Painter sample is more controlled and refined from loose paint to detail. Painter is my preferred painting program but I enjoyed my Photoshop painting experience and as I said earlier, I don’t hesitate to take a painting out of Painter and into Photoshop for some global adjustments or light painting along the way. I choose to have both programs and use the best of what each has to offer.
It might be a good time to note that Corel and Adobe have opened a window to share some integration.

There is now a Corel Painter plugin for Photoshop that shares some of Corel’s new Particle Brush Technology. It’s called Particle Shop. Particle Shop comes with a starter pack of brush variants and the option to purchase other modules for hair, fabric looks etc.
In conclusion, when it comes to the Corel Painter vs. Photoshop showdown, it’s my opinion that Corel Painter is a superior program for drawing, sketching and painting.
Adobe Photoshop is superior for image composites, image adjustments and retouching.
While it is possible to produce paintings in both programs, Corel Painter has a lot more built in benefits that allow painters to work intuitively. It provides an organic pleasurable painting experience – and the new particle technology is WOW fun – so check it out!
What Next?
I have written quite a few articles on how to digitally paint using Photoshop.
A great place to start if you’re new to digital painting is with my “Brush Tool Basics” guide, available for free download with the link below.
Happy painting!
Jane Conner-ziser is an award winning photographer, digital artist, premier educator and independent consultant. With over 25 years of experience, 19 of them in digital imaging and evolving technologies, the techniques Jane developed for facial retouching and enhancement and portrait painting from photographs are widely emulated by photographers and digital artists worldwide through her classes, online training and educational products.
