

How to create patterns in Photoshop – step by step instructions on creating polka dot patterns, photograph patterns, and more!
Photoshop offers a variety of ways of working with and using Patterns.
Patterns can be brushed on using the Pattern Stamp Tool, used to fill selected areas with the Paint Bucket Tool, used as an overall fill (Edit / Fill / Pattern) or applied as part of a Layer Style (Pattern Overlay).
Patterns are used to create decorative papers and to apply overall or specific area texture.
Applied to Layers, users can distort, stack up and take advantage of Blending Modes to further expand the range of visual results possible.
Photoshop comes with a library of Pattern Presets.

Not all of the patterns are in the active library, but it’s easy to choose them from the fly out menu just by clicking on the collections you want to use.
In addition, the Preset Manager for Pattern can also be accessed from this fly out menu (or by choosing Edit / Presets / Preset Manager from the Main Menu Bar – it opens to show the Brushes, but you can choose Patterns from the drop down menu there).
The Preset Manager allows you to delete Patterns you don’t like, drag and drop individual Patterns to organize them to your liking, save your own set of Pattern presets, export them to destinations outside of Photoshop, share them with others or load their custom collections into your Photoshop.
More from our Popular Tools in Photoshop series:
Photoshop also allows users to create their own custom patterns, something I find valuable because I like my work to be distinctively different from everyone else’s and textures, papers and patterns are one of my “secret tricks” I keep in my creative toolbox.
Hope that helps some of you out that would like to return to this guide later or print it out!
Patterns are easy and fun to make! Let’s get started with an easy one: polka dots.
Creating a Custom Pattern

This is the basic set up for making an overall polka dot Pattern. I created a new canvas (File / New).
Patterns are repeated by tiling. This means that the edges have to line up exactly in shape, color and value. If it’s not exact, the Pattern fills with checkerboards rather than providing a seamless texture.
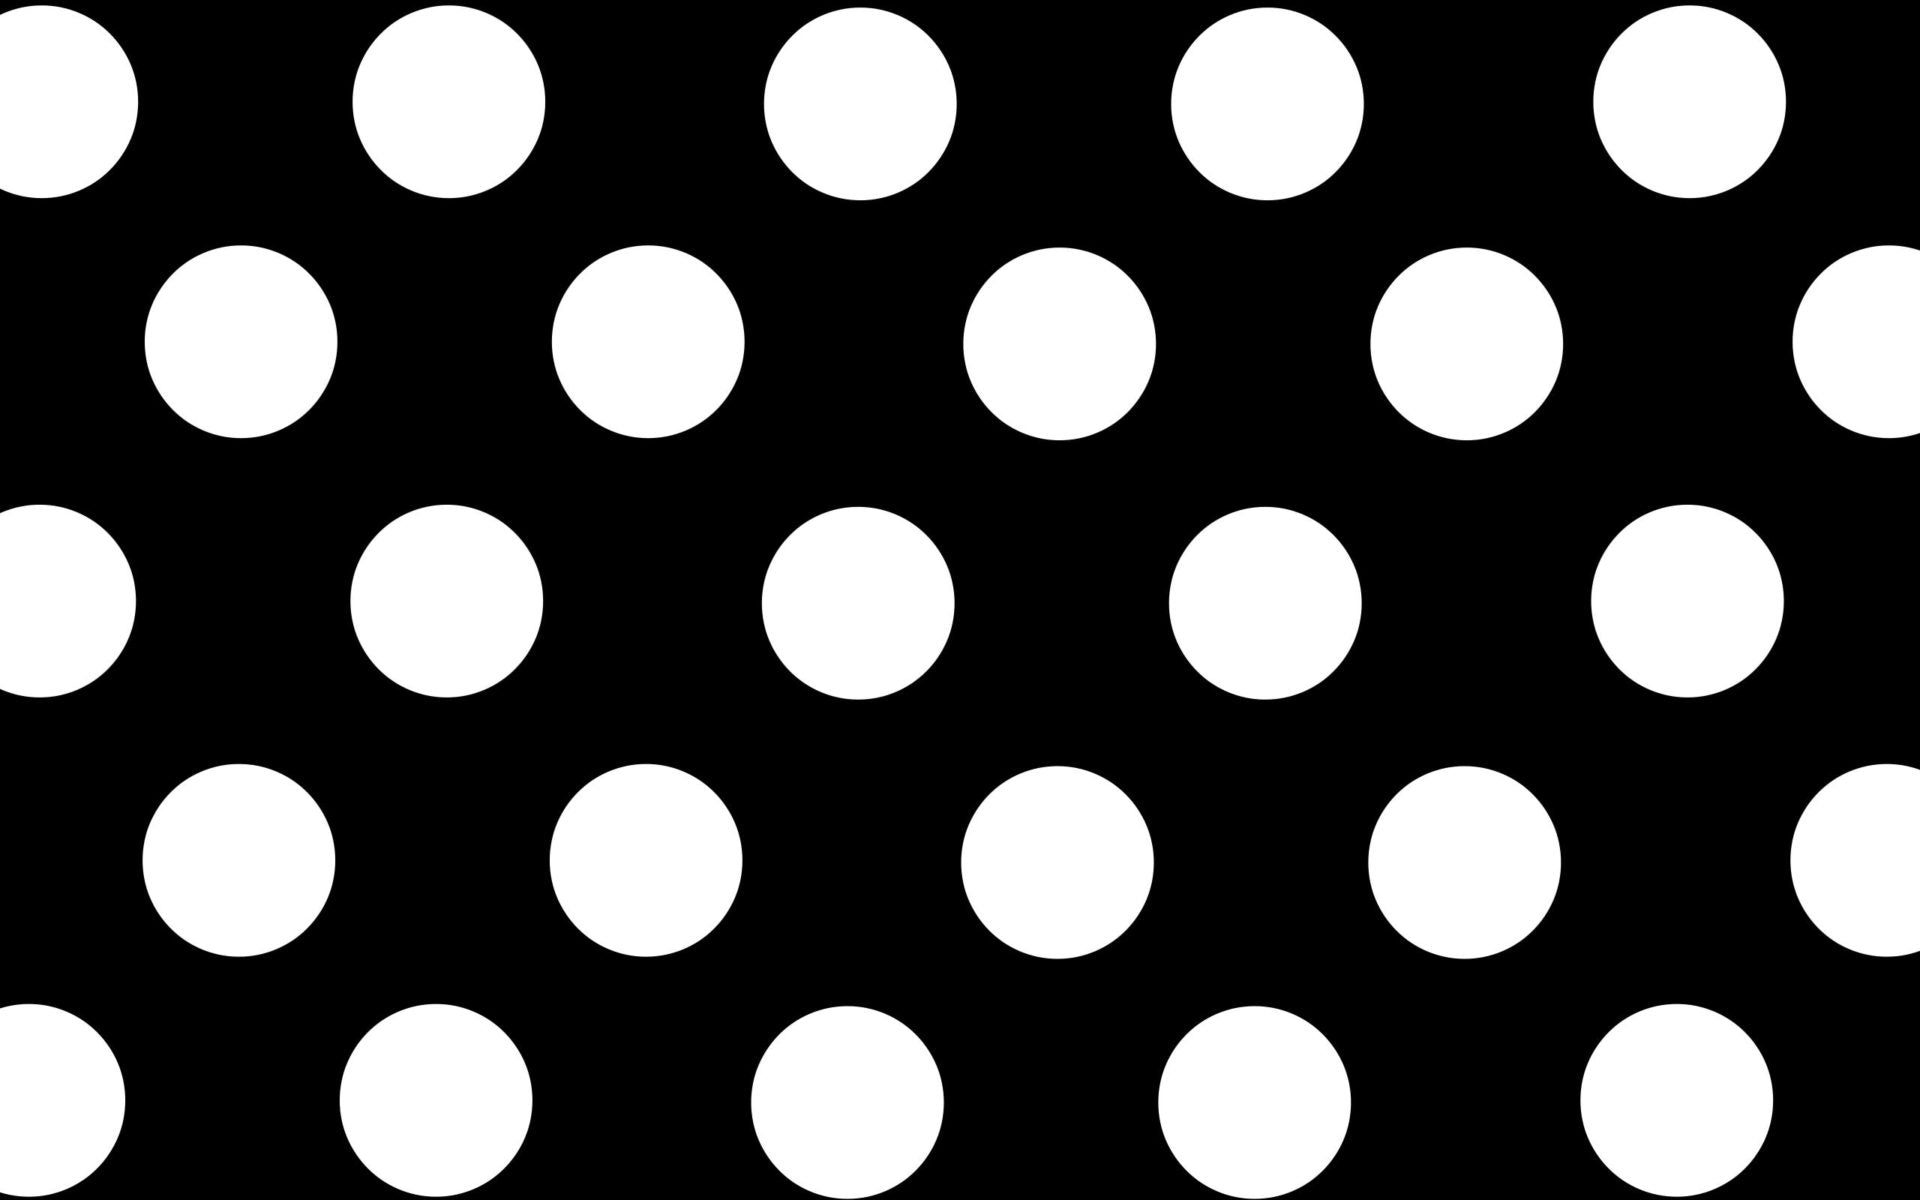
A perfect polka dot can be achieved by placing a dot exactly in the center of the canvas (we can call it a tile).
I brought in some rulers to mark the center of the New Canvas. (View / Rulers, press inside the ruler bar and drag one out from the top and also the left side. Line them up exactly; don’t be afraid to zoom in.)
The Elliptical Marquee was used to create the circle, exactly in the center of the tile.
TIP:Hold down the Shift Key and the Option (Alt) Key to make the circle. The Shift Key constrains the Elliptical Marquee to a perfect circle. The Option (Alt) Key makes it draw the circle from the center out. Position the cross hairs of the Elliptical Marquee over the center of the tile, press and drag the circle out from the center.
Choose Edit / Fill and fill the selection of the circle with black.
The next step is to capture the Pattern.
If you want the Pattern to fill with black polka dots including the white background, all you have to do is choose Edit / Define Pattern and give the Pattern a name.
However, if you want the Pattern to fill with black polka dots and a transparent background, turn off the visibility of the Background Layer prior to choosing Edit / Define Pattern.
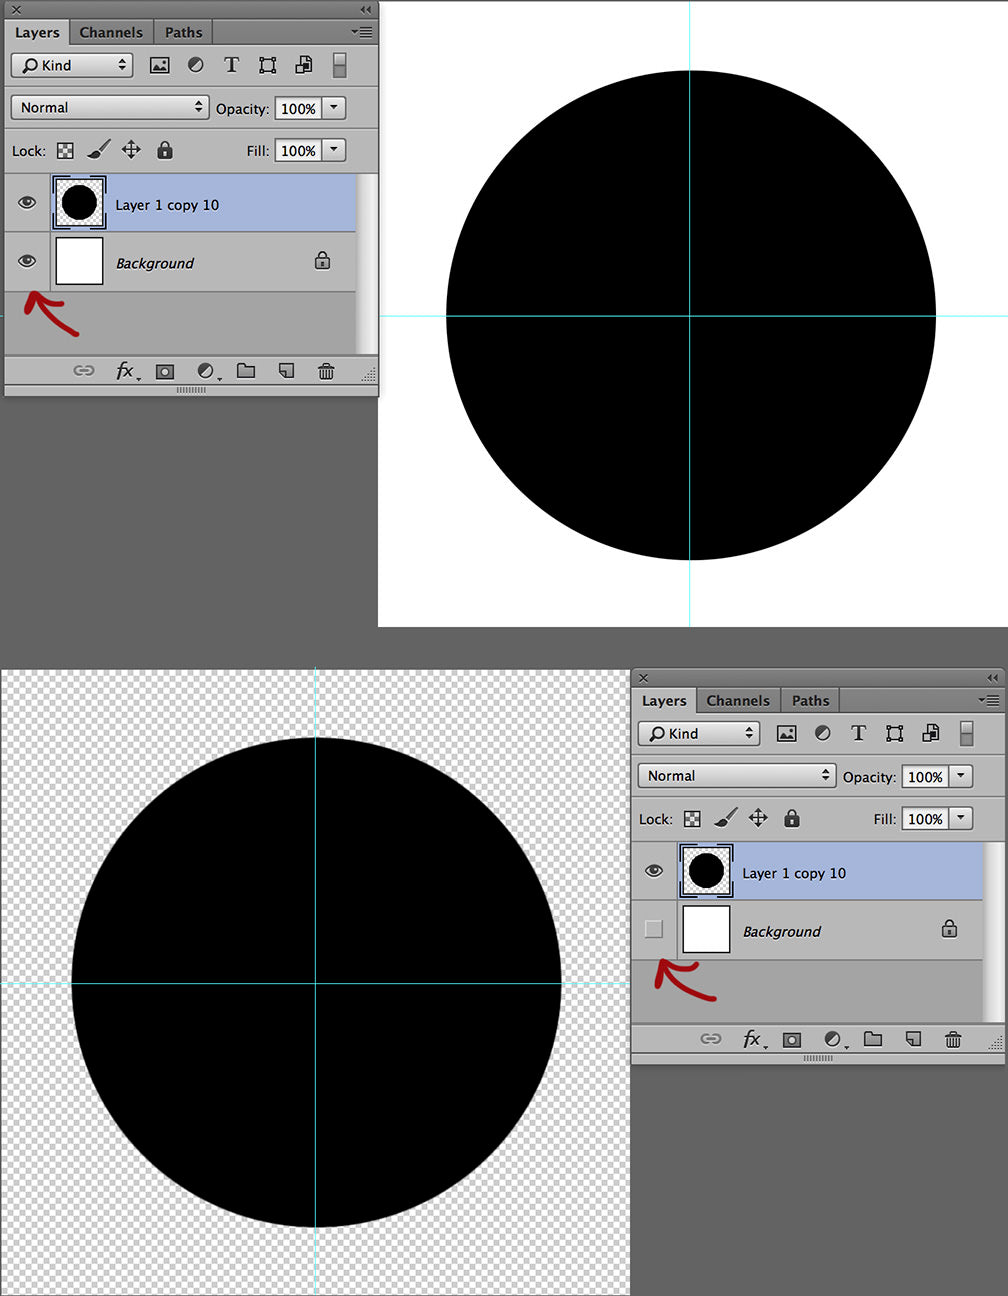
The end result on a new canvas using Edit / Fill / Pattern upon a New Layer is the difference Illustrated Below:

The Pattern defined with the white background visible is using both the white background color and the dots. The other one, where the background visibility was turned off is using the dots on transparency, revealing the new background around the dots.
Now let’s look at some different ways of applying Patterns. The easiest is the one I used for the previous sample.
Applying Patterns In Your Work
I created a New Canvas, created a New Layer on top of the Background and then chose Edit / Fill / Pattern, choosing the new Pattern we just created.

When Patterns are applied this way, Photoshop applies the Pattern in the size and resolution the Pattern is in relationship to the size of the file it’s being used upon.
In other words, the sizing is automatic; you don’t get to choose how large or small the pattern is going to be.
The same is true when brushing the Pattern on using the Pattern Stamp Tool. The Pattern Stamp Tool does allow you to brush the Pattern on using different brushes and opacities for more artistic effects, however.

In this example, I chose the Pattern Stamp Tool (nested with the Clone Stamp Tool in the Vertical Tool Bar).
I used one of the default artistic brushes and varying degrees of opacity to create organic looking balls using the circle Pattern we just created.

I applied the brush stroked Pattern to a New Layer in order to later have the opportunity to change the color.
Patterns are basic graphics and unless the original Pattern is colored, colors must be added after the application using filters, gradients, fills or hand painting.
Because I brushed the circles on to a New Layer, I was able to Lock the transparency of the layer and use different colors and opacities to color the circles the way I would like to see them.

Filters, Gradient Fills and Layer Blending Modes may also be used to change the way the Pattern looks.
My favorite way of controlling the scale, opacity and blending mode of a Pattern is to apply it using the Layer Style options.
Here I’ve duplicated the Background Image of the cat and chosen Layer / Layer Style / Pattern Overlay.
Here one can choose the desired Pattern (I chose one of Photoshop’s default paper textures), scale it to look nice on the image and adjust the blending mode and opacity of the texture.

From here, one can use Layer Masks and additional Blending Modes to change the overall Pattern into one of varying degrees of intensity, perhaps removing some of it from the cat’s face and allowing the texture to be heavier around the edges.

Here’s an expansion of our simple circle that shows how to create an all over paper pattern, like wrapping paper. The tile is a perfect square. The center circle was copied four times (HINT: paint a tiny white dot in the center first so each new circle has a center dot).
Each additional circle was placed so the center was exactly at the corner of the file (After it’s perfect, use the Brush Tool, black paint at 100% opacity and flow to paint out the white center dots).
A custom shape was brought in, one that looks like ribbon, and positioned nicely within the tile. Notice that the edges of the ribbon disappear into the corner circles.
Horizontal or vertical placement in the example requires that top and bottom, left and right graphics also line up perfectly with each other for seamless tiling.
Edit / Define Shape. Note that the Background visibility was turned off. A New Canvas was created. The background was filled with a foreground to background color variant. The background was duplicated.

Layer / Layer Style / Pattern Overlay. The new Pattern was selected and scaled to fit the canvas in the desired manner. The Pattern was black.
From there Select / Color Range was used (from the Main Menu Bar) to choose Black at full fuzziness. A new Layer was created; the selection was filled with a medium shade of blue.
While the selection was still active, Adjust / Hue Saturation was chosen from the Adjustment Icon at the bottom of the Layers Window.
The layer was created using the selection as a mask so any final adjustments would occur only within the dots and ribbons, leaving the background color unchanged.

Creating Patterns Using Photographs
Patterns can be made using photographs, too. Here’s one that was created using Sherman’s head; one from the color image and one that was converted to Black and white:

Here it is easy to see how important it is to match up the edges of the files if one is looking for seamless tiling!
For those of you who might want to do this, choose an image that has a consistent edge, like this one, and pre-retouch it so that all edges are exactly the same color and value.
You might cut and paste one edge around all four sides and then diffuse all of the edge variations using a Paintbrush and one of the colors chosen from the carpet.
This example is a better tile effect.

Using Patterns In Image Retouching
Patterns can also be used correctively in image retouching. One can create a pattern from one area of an image and apply it in a different place.
Portrait retouching artists often create a texture from “good” skin tone to transfer into areas that have gotten too smooth from over retouching or that were blown out from oily skin or poor exposure.

In this illustration, the photographer mistakenly used a hair light on a bald gentleman’s head. It’s a fast fix to combine paint and pattern if there is some nice skin texture to use as the base for the pattern.
It’s important that the pattern line up decently in order to prevent obvious tiling, so a selection was made from an area of the man’s forehead that was pretty evenly lit.
I copied that section to a New Layer to perform some additional pre retouching as far as edge color and value was concerned. Then I defined the selection as a Pattern.
From there a New Layer was created upon which paint was applied using the Paintbrush Tool at 30% Opacity and 100% Flow, choosing colors from other areas on the gentleman’s head.
The bright highlight was quickly covered, but the area was too smooth. Another New Layer was created and the Pattern Stamp Tool was used with the new Pattern to apply texture across the smooth area. Finishing touches were added using the Clone Stamp and a small brush.

Patterns are versatile and easy to make and use for decorative, artistic and corrective work in Photoshop.
Saving Custom Patterns
I export my custom Patterns to a folder on my hard drive, outside of Photoshop, so I can access them when I need them without filling the Pattern Preset Manager with hundreds of Patterns that won’t be used frequently.
It’s also a good idea to edit through collections of Patterns to organize them the way you like them and to save your favorites as your own custom collection.
To do this, just highlight the ones you want to put into your collection in the Preset Manager (click on on and then hold the Shift Key down while you click on the others you want) and choose Save Set.

To load new sets of Patterns, choose Load from the Preset Manager and navigate to the ones you want.
Default Photoshop Patterns can be accessed from the drop down menu at the far right in the Preset Manager or within any of the Pattern menus accessed through tools that use them.

Closing Thoughts
I hope this small exploration of Patterns has been fun and easy to understand.
It’s my goal to take as much mystery out of Photoshop as possible so anyone, even brand new users, can begin to experiment with and enjoy the powerful creative tools this software has to offer.
You can become your own Photoshop Guru!

More from our Popular Tools in Photoshop series:
- Spot Healing Brush Tool
- Healing Brush Tool
- Clone Stamp Tool
- Dodge and Burn
- Brush Tool Basics
- How to Create a Custom Brush

Jane Conner-ziser is an award winning photographer, digital artist, premier educator and independent consultant. With over 25 years of experience, 19 of them in digital imaging and evolving technologies, the techniques Jane developed for facial retouching and enhancement and portrait painting from photographs are widely emulated by photographers and digital artists worldwide through her classes, online training and educational products.
