

Canvas prints don’t have to be stretched. Here are some instructions on how to mount canvas prints.
When printmakers think about canvas, they tend to think about stretching.
This traditional process requires that the printmaker either pays someone to stretch the canvas for them, or takes on the training to learn how to stretch.
It is possible, however, to produce canvas prints which can can be turned into beautiful framed prints without stretching. And, because canvas doesn’t have the same needs as a paper print, it can be displayed without any glazing (glass) for an exciting, unique look:

This process is done with a wet mount of a coated canvas to a substrate such as gator board. In the photograph above you can see a 28″ x 28″ canvas print that was mounted to gator and has been framed.
What is Gator board and why not just use foam core?

Gator board has a much more durable surface, and can take a wet mount without damage.
By design, gator is very stiff and comes in various thicknesses. I choose to work with 3/16″ and 1/2″ for my work. Gator will not deform over time and will resist bending and due to the stiff nature of the product it will not show any rippling when the canvas is mounted.
Foam core is not a great solution as it’s much softer by design and will easily allow a pressure dimple or other type of damage to the print. Foam core also will not work well with a wet mounting type solution as it will tend to separate and warp if it gets moist. Most foam core doesn’t have a perfectly even surface and thus will not allow for a print to mount well.
Getting Started
For this type of mount, you need to make sure you have coated your canvas as the application involved a wet mounting process.
So if you are using Crystalline or any “glossy” canvas which is aqueous based, you can’t allow any water to get on the face of the canvas. If this happens, then the ink will more than likely wipe off as you clean the print. For my work, I use both Breathing Color’s 800M matte canvas and Crystalline. Before I get ready to mount, I will coat the canvas with Breathing Color’s Timeless glossy coating.
This will protect the print during the mounting process and add years of protection to the print.
Trimming the Canvas
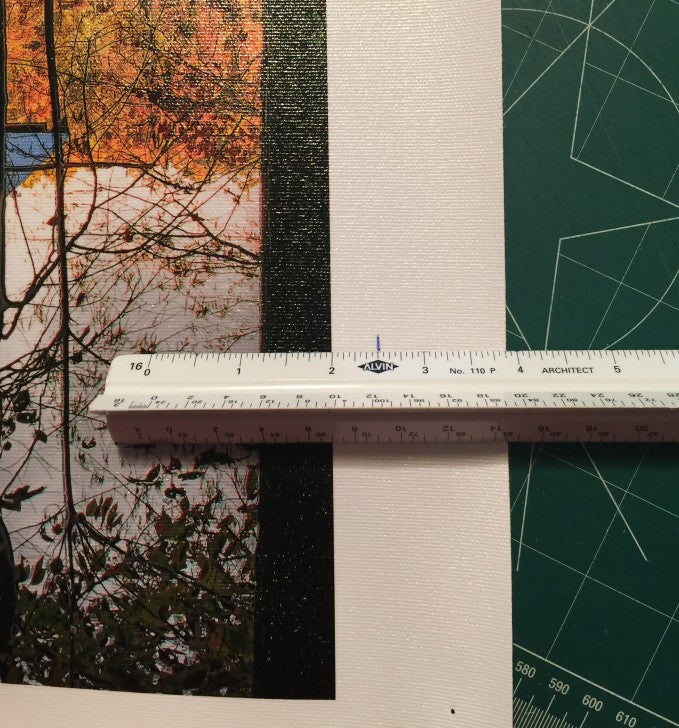
Once I have the canvas coated, I will trim it to the final size for mounting. I prefer to leave a 1/2 inch border on the canvas to allow easy handling of the canvas during the mounting. So I quickly make a set of tick marks around the print and trim it down to size.
For example on a 20 x 30 canvas, I will have a canvas that is 21″ x 31″ and I make the Gator board the same size. This means you do have a bit of extra waste but to me the extra is worth it since the 1/2 border means I have some room to handle the print without getting my fingers on the face of the print.

With the canvas trimmed, you are now ready to prepare the gator board.
Preparing the board with glue
Gator comes in white or black. I use black, simply because I use a white glue and it’s much easier to see the board with glue on it to make sure you have 100% coverage.
For our 20″ x 30″ print, which is still 21″ x 31″, I have cut a 3/16 inch piece of gator to the same size of 21″ x 31″. I will always wipe off the gator with a damp rag. This helps to set the glue to the board and remove any small particles that may be sitting on top of the gator. Then I will lay out the glue. I use a brand called Miracle Muck. This is a fast setting water based glue that has excellent adhesion properties.
For this process, I start with 2 large spots of glue towards the center of the gator.

With a soft burnishing brush, I will then start to layout the glue evenly across the gator. While doing this, you want evenly distribute the glue across the face of the gator board. I tend to make a series of passes, going up and down and then across the face of the gator board.

I use a standard 4 inch print maker’s roller to layout the glue. This roller has a soft gum rubber finish, not a hard one. I prefer the 4 inch roller for all sizes of gator board as I feel I get better control over the distribution of the glue. When you are finished rolling, make sure you take the roller to the sink and wash off the glue as it will start to set quickly.

Picking the right tools
Before we go to the mounting of the canvas, let me briefly talk about the tools I use. In this image you can see a close up of the two rollers I use and the soft tack/lint free rag.

1.The soft roller is made from black gum rubber and is found in most art supply stores. It’s called a burnishing brush and most commonly used in lithography and print making. I have found it to be indispensable for the process of rolling out the glue. You can pick these up in various widths but I prefer the 4 inch size for all my work. Over time the material of the roller will harden and crack, so expect to replace this roller in a year or so.
2. This item is a hard roller and I use this once the print has been placed on the glue prepared gator board surface. This roller is around 8 inches wide applies a nice even pressure to the face of the canvas to make sure all the air bubbles have been removed. The key to this type of roller is the metal frame. Make sure you get one with a stiff frame that won’t bend, or the roller will bind up under pressure.
3. The last item is a lint free soft rag, most commonly found in a auto parts store. In the process of mounting I will use this rag many times. To help lay down the canvas and then to clean up any excess glue that might have slipped up to the face of the canvas. You want to use this rag damp, as a dry rag may lightly scratch the face of your canvas.
Mounting the Canvas
As soon as you have the gator board covered with glue, you want to start the mounting process. This is the most critical part so take some practice runs on smaller prints, before you try to mount an image larger than 16″x 20″. The glue I use has a working time of about 5 minutes, after that, if you don’t have the print down flush, you will need to pull the print off, and re-lay down your glue. Remember back when I first trimmed the print, I left a 1/2 inch border. This allows you a bit of room for errors and more importantly, you can pick up the print without worry of getting your a glue print on the face.
Now that we’re prepped and have the right tools, we’re ready to mount the canvas.
1. Take the print and roll it up so the side to be mounted is outside. Then line one of the edges of the canvas to the gator board edge. It’s much easier to work with the print rolled up than trying to lay it down in one large step.

2. With your damp rag, on the face of the print (NOTE: if you are using a glossy canvas, you must coat it first) unroll the print and at the same time apply some light pressure to the face of the print. With one hand control the roll of the print and with the other smooth out the print over the gator board.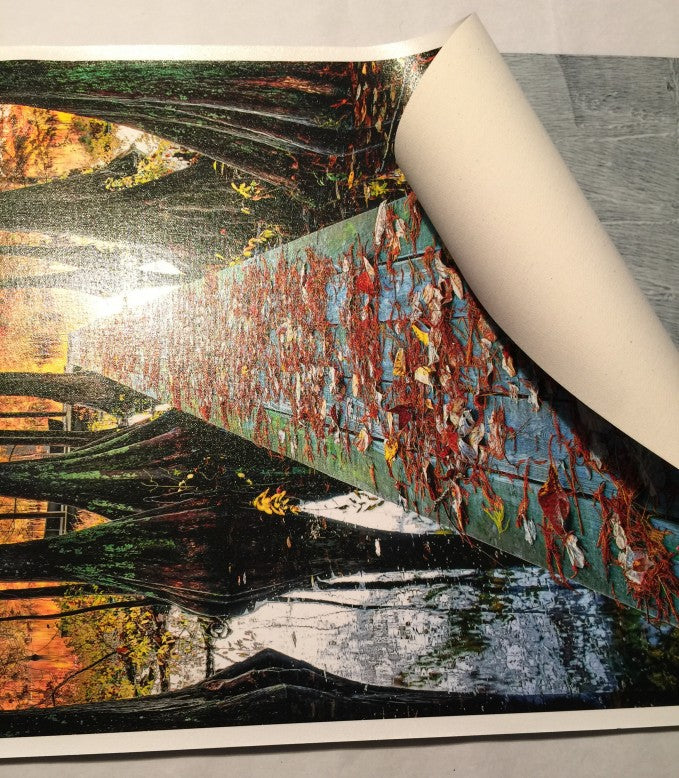
3. Once you have the print all the way rolled out, take your hard burnishing roller and start at one end of the print and roll across the face of the print. Apply a considerable amount of pressure during this step as you will not hurt either the print or the gator. Again this will take time to get the hang off. But this step is very critical as you don’t want any air left under the canvas. Once you have finished, take you damp rag and wipe over the face of the print just to feel for any bumps. This is more important on a large print of 24″ x 36″ or larger.
4. Once you feel the print is down evenly, pick up the gator board and hold the mounted print in the light at an angle and look for any bumps or problems on the face, as now is time to get them out. If you see some trapped air, just get your damp rag and work it out. It you see a piece of trash, you will need to pull the print back, remove the debris and then re-burnish.
If you do this within the first 5 to 6 minutes the glue will still set, but if wait any longer, you may need to re-apply some glue on the board. Also look to see that you don’t get some glue on the print or have wiped a bit of washed down glue over the face of the print. This is easy to get off now, but next to impossible once allowed to dry.

5. When you are done, you print should look like this. You may see that the gator board has bowed up due to the moisture, but don’t worry as during the drying process this will all come out. Plus since the mounted print is going in a frame, if you see a bit of bowing still after drying, do not worry as the frame itself will even the print out.
Do a quick check on the back of the print to make sure you don’t have any globs of glue there. This is just a nice way to finish the piece front and back.

If the print is a 20 x 30 or larger, I like to place some weight on the face of the print while it dries, just to help keep the bowing to a minimum.
I like to let the prints dry overnight, but if you are in a push you should be to trim the piece after about 6 hours. Just take you finger and pull back on the edge and see if there is any play with the canvas. It should totally resist any attempt to pull it back if the glue has dried.
Trimming the Finished Board
Now all that is left is the trimming, and this can also be a bit tricky. Gator board is much stiffer than foam core and even 3/16 inch will require several cuts. What I like to do is use a ruler, lined up on the white border, and using fresh blade in an olfa hand cutter make my cuts.
These cutters have a segmented single blade and you can easily break off the dull tip and keep on cutting. You don’t want to to use a blade on too many cuts as gator board will dull a blade quickly. The process I like to use is as follows:
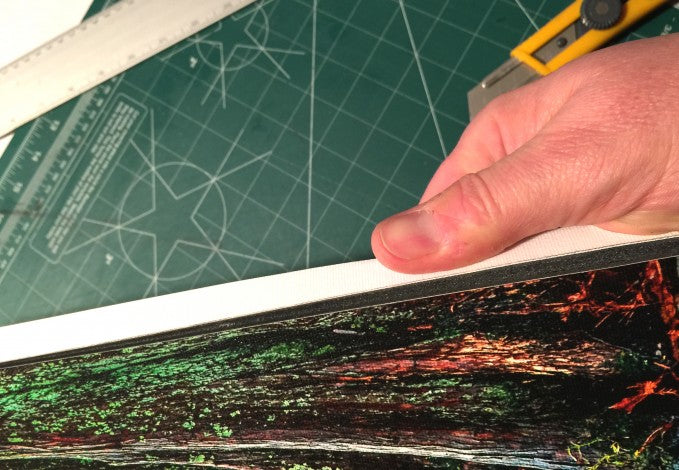
1. Line up the straight edge along the white border, and make your cut all in one even pull. The first couple of passes will cut the canvas and start to break into the gator board. I always make sure to cut into a cutting mat. These are designed to absorb the point of the blade and help you control the cut. You can see the green cutting mat in the picture.

2. After you have made the cut down into the gator board, you will start to see the smooth way the gator board has cut away and given you a clean edge. If I am working on prints that I know are going into frames, I will go ahead and snap the gator board after 2 cuts. You can see in this picture as I am pulling the cut gator board away which shows the clean cut.
3. On a larger print, you may want to tape down the ruler, as it’s easy to have the ruler move just a bit as you move down the print. On 20″ x 30″ prints or larger I always do this. There is nothing worse than getting all this work done up to this point to have an errant blade cut into the print and ruin it. Take your time on this part. Also be aware that cut gator board edges are very sharp and by running you hand over them, you can get a cut pretty quickly.

The finished, mounted print is now ready to put into a frame. I will often blacken the upper edge of the print as you can see the white line of the canvas against the black of the gator.
This is a great way to get into canvas printing, and not have to focus on stretching. The finished product in a black frame is shown below.

Have a question about mounting canvas prints that I didn’t answer here? Leave it in the comments below.
For more information about Paul, and to check out some of his awesome photography visit photosofarkansas.com

Paul Caldwell has been working in the photographic arts since he was 15 and has been a professional photographer for the last 10 years. As you would imagine, Paul has a wealth of knowledge when it comes to photography and printmaking. He sells some great looking prints on his website and offers one-on-one classes covering everything from capture to print.
Frequently Asked Questions
How do you mount a canvas print?
You can mount a canvas print without stretching it. There are two techniques: wet mounting and dry mounting. Wet mounting means using a liquid adhesive to adhere the canvas to a rigid substrate. Dry mounting involves using a film laminate to stick the canvas to the rigid surface. When working with canvas specifically, it is best practice to use the wet mount method. If you are mounting a more smooth media, such as photo paper, then dry mounting is common and often easier. With the wet mount process, you basically mount the canvas to Gatorboard (or MDF, or masonite, or some other rigid substrate) in order to give the finished piece its rigidity. Gatorboard is dense, durable, and relatively lightweight. This allows for a simple, damage-free workflow as well as safe transport or shipping to the client.
How do you hang a stretched canvas?
The easiest way to hang a stretched canvas without framing is a simple nail. Please note that often one nail will not suffice. Using two nails instead is a better idea. One for each corner for ultimate support. Use a ruler, a level, two 2 inch nails, and a pencil for this DIY project. Place the painting in the final position you would like it in. Use a level to mark the top two edges of the print. Next, you want to balance it with the level. Then measure 1 inch down from your markings and make two additional marks. Make sure to use the level between the two sides. The lower marks are for the nails. Hammer the nails leaving about half an inch (1/2″) protruding. For the final step, rest the canvas on the nails. Voila, you’re done.
Can I frame a canvas print?
Short answer, yes you can frame a canvas print. A common reason to frame a print is because of unsightly sides of the canvas wrap. There are different ways to wrap your canvas. Methods include gallery wrap, museum wrap, and standard wrap. Gallery and museum wraps are ones that you would have no problem hanging as is. The standard wrap is one that people would frame to hide the sides since it is not uncommon for a standard wrap to be stapled on the side of the stretcher bar instead of the backside. This is all personal preference but this is our experience from talking to both print makers and people who purchase printed art and photography.
How to frame a rolled canvas print
We recommend that you take one of two common paths: 1) stretch a rolled canvas yourself using a DIY system like Breathing Color’s EasyWrappe, or 2) have your rolled-up canvas print stretched for you. For this, you can use your local print shop or frame shop. Do a Google search and then call around. You can frame your canvas a number of different ways offered in the market. You can have the canvas stretched and then put into a canvas floater frame. Or frame it, as you would any other print, using a wood, metal, or even acrylic frame.
How much does it cost to frame a canvas print?
There are a number of factors for pricing out a canvas frame. It can range from $8-$20 per linear foot. This comes out to around $50 to $150 per print or a lot more depending mainly on the size of your print, stretcher bar thickness, and frame thickness. It is best to call around for quotes.
