

Selecting an HVLP Spray Gun, setting it up, and using it to coat with Breathing Color’s Timeless.
We brought in pro photog Paul Brock to share his expertise on the subject, here’s what he had to say.
I am a photographer and produce limited edition photographic artwork. I enjoy and take pride in producing my work start to finish (printing, finishing, wrapping/mounting).
My work product is generally relatively large canvas prints (48” by 20” and larger) and recently I decided rolling was no longer practical as my production volume increased. Not to mention the difficulties of rolling a finish onto large print areas.
I have switched to spraying (versus rolling) and I could not be happier. I am realizing excellent results but it did take some trial & error to determine the optimal settings of the HVLP sprayer. I am sharing my experiences with you hoping that it will save you some of the pains I experienced.
Background

Through trial and error, I have learned the value of a good finish on my prints, and after trying several products I would not release any prints without first applying Breathing Color’s Timeless giclee finish. The Timeless finish is superior to everything else I have tried – if you are not using it, try it!
Using trial & error once again I have established a fairly controlled process for spraying Timeless satin finish onto matte canvas using a Wagner Flexio 590 HVLP sprayer. I have sprayed a variety of materials now but these notes relate almost exclusively to the application of the Timeless satin finish onto matte canvas.
Selecting the Sprayer and Nozzle
Having had some experience in the past with electric sprayers I knew I did not want the least expensive and after some research I opted for the Wagner Flexio 590. The 590 is readily available at Home Depot and presumably other places.
This kit comes with large (iSpray) and small (Detail Finish) nozzles, and X-Boost Turbine all packaged in a convenient case (Figure 1). I felt this combination would give me flexibility for various applications and spray materials. I do not use it everyday so it was also important to me that I could pack it up for storage when not in use.

The large (iSpray) nozzle (Figure 2) is theoretically appropriate for spray transparent and semitransparent finishes but I found that it splattered when in use and have stopped using it for finish spraying. The smaller (Detail Finish) nozzle (Figure 2) on the other hand works exceptionally once the settings are optimized.
Setting Up the Spray Gun
Using the detail finish nozzle there are two control settings to consider as follows:
Air Power

Air power is controlled using the dial on the top of the Turbine as shown in Figure 4. The manual recommends setting from min to 3. I found 2 to be optimal in combination with the Material Flow setting described below. With increased air power I found there was increase overspray and material in the air. With decreased air flow I found the material sputtered.
Material flow is determined by the Control Knob on the back side of the trigger which limits how far the trigger is pulled and thereby limiting how far the flow control valve is depressed (see Figure 5 & 6).


By turning the knob and adjusting how far it extends out the back of the trigger, the flow valve is prevented from being fully depressed and thereby limiting the flow rate. When the knob is fully seated there is no limit to the material flow. The manual recommends medium to heavy flow but there is no reference numbers or measurement on the knob adjustment and therefore it is difficult to quantify the settings.
To overcome this I reference the back side of the threaded stem to which the knob screws into. When the back edge of the yellow plastic threaded stem aligns with the back of the control knob I found this to be a very suitable flow setting.
I found increasing the flow volume caused an excess of material flow and a less desirable results. Decreasing the flow volume caused insufficient material to flow.
Applying Timeless
Using the above settings I have found 1 foot per second rate of movement to be about right. I spray with the nozzle about 8” from the work surface. And, I shift each pass about 3” to ensure overlap of each pass. I consider one coat complete after I have done two complete series of passes (one series horizontally and one series vertically).
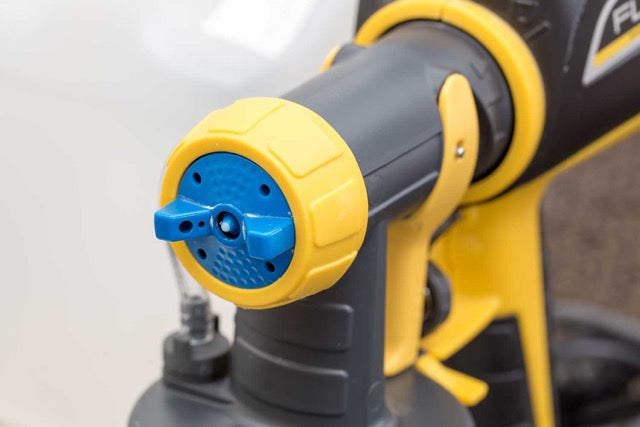
Between each of these series I pause only long enough to turn the air cap ear’s (see Figure 7) which shifts the spray pattern from horizontal to vertical and vice versa. Using this technique I apply approximately 0.30 fluid ounces per square foot. And, then after that has dried apply a second coat for a total finished coat of approximately 0.60 fl.oz./sq.ft.
I have created a spreadsheet form to log the material used on each piece of art. This is my quality control mechanism to ensure each piece has sufficient coating. By recording the material level in the container before and after each piece of art is coated I can calculate material used and therefore coating thickness.
It also always me to log the coatings for each piece of art which I can refer back to in the future should I have any issues with the finish. In my experience an optimal coating is achieved by applying about 0.60 fluid ounces of material per square foot over two coats.
Initially I attempted to coat my canvases with a single coating but found it too difficult to apply sufficient material without it running. Later I found it was much easier to plan for and do two coatings. While it is probably possible to complete the finish in a single coating I found I could achieve a much more consistent finish by planning two coatings.
When I get down to below 0.40 fl.oz./sq.ft. the finish is too thin and an additional coating is required. If the coating is applied too thick in a single session 0.50 fl.oz./sq.ft. or greater there is an increased tendency to run and or pool depending on how you are drying.
Re-Coating Notes
In my initial attempts to spray I found that I had not applied sufficient material to several large pieces. It was not easy to see but if I turned the finished print such that light was reflecting of it at an extreme angle I could see a hint of the horizontal and vertical patterns I used during the spraying. It took me a few days to realize this and at that point I was concerned about applying another layer to the fully dried finish.
However, I applied an additional (relatively light) coat of finish to the dried prints and the cured perfectly. As noted above I have subsequently made my standard process two coats but it is great to know you can apply more finish if needed after several days.
Start With Some Practice!

Regardless of how effective these notes are you will still need to do some practicing. I initially used old prints and found that it was very difficult to see the spray pattern on the fly. I discovered that using a standard brown corrugated card box box, cut open and flattened, allowed me to see the spray patter and adjust my technique on the fly until I was happy with the timing and spacings.
Conclusion
Applying Breathing Color’s Timeless giclee finish using the Wagner Flexio 590 produces excellent results. Some of the subtleties of application will surely vary depending on environmental conditions as well as ink and paper combinations.
However, once the settings you need are determined you can expect excellent repeatable results which far exceed the quality of roller applied finishes particularly for larger print sizes.
