BC-being-in-vs-looking-at-COVER

Printmaker and photographer James Bourret shares his thoughts and experiences on the immersive qualities of large scale canvas prints.

What Is This?

In our “BC Community” features, we invite printmakers, fine artists, and photographers to share their passions, stories, and work.

Connect with new artists and printmakers, and learn how working professionals think about art, process, and life with this exclusive series of written blog posts and audio interviews.

→ Interested in being featured in a future “BC Community” post? Get in touch with us!

Introduction

My name is James Bourret, and I own and operate a gallery of landscape photography in the mountain resort town of Ketchum (Sun Valley), Idaho.

My work has been published (Lenswork # 83 and others), exhibited (most recently ‘On the Trail of Ansel Adams, San Diego Natural History Museum) and is held in collections world-wide.

I have a background in architecture and design, and began photographing 40+ years ago, in my early teens.

I work primarily with a view (tech) camera and medium format digital back. I print on a large format Epson printer in my studio, often on canvas.

BC-being-in-vs-looking-at-10

A Waterfall You Can Feel

In the past few weeks I have been working on a commissioned piece for an Oregon client, a software entrepreneur.

He had purchased a triptych of mine, of a fall aspen scene here in the Sun Valley area. He asked if I would make a similar piece on his property in Portland, near the very beautiful Tryon Creek State Park, which I had visited.

The property has a stream and small waterfall, in deep forest. When I visited the property in early April, it was overcast and raining, which proved to be perfect.

BC-being-in-vs-looking-at-3

The stream-flow was high, and the mosses and leaves glistening with water droplets. I stood in the stream in my muck boots with an umbrella protecting the view camera, and using a pano head, made multiple exposures for stitching.

The resulting stitched file had to down-rezzed to to be saved at Photoshop’s maximum save size of 4GB!

The resulting 60 x 120in triptych print has so much detail and depth that one feels they could sit down on the mossy boulders next to the waterfall, and get wet in the rain and spray.

BC-being-in-vs-looking-at-4

Communicating Ideas In 3 Dimensions

Over the last year or two I’ve increasingly had opportunities to make and exhibit pieces that go well beyond the scale of the typical framed photograph or large gallery print.

Beginning with an opportunity make an installation in the local Visitor Center, I’ve made a series of pieces as diptychs and triptychs, at sizes in the range of 60 – 80 inches tall by 80 – 120 inches wide.

In making the first triptych for the Visitor Center, I had wanted to make the piece large enough to be well scaled to the space it was going into, so I knew it needed to be quite large.

BC-being-in-vs-looking-at-1

The thing I learned in making the print, which was 60”h x 83”w, was that there is a point at which the artwork begins to feel immersive. The print wasn’t just bigger; it had an entirely new quality that I hadn’t seen before.

Owing to the techniques and the type of camera equipment I use (a view camera with an 80mp digital back), the prints ‘open up’ and develop a three- dimensional feel and depth that draws the viewer in.

They also have exceptional detail, and the combination of these factors creates an invitation to ‘step in’ and explore the image.

Since that first triptych, I have made others, primarily forest scenes, and you feel you can literally walk into them.

BC-being-in-vs-looking-at-6

The smaller prints (up to 40 x 60”) I had made of a number of the images had been beautiful and full of detail, but were relatively ‘flat’. The difference was astounding. Size really does matter.

Since making that first large scale triptych, I have come to understand some of the qualities that are needed in making a successful large scale piece, and now try find those qualities in a scene as often as possible when I am out shooting new images.

I’m doing new things when shooting, and also taking new steps in the process of preparing the image for printing to increase depth, detail, and three-dimensionality.

I have always been interested in making images with depth, which I think comes from my background in architecture.

I visualize and compose 3 dimensionally, and in my design work had the need to communicate ideas in 3 dimensions. I think it is because of that that I have never thought of photographs as being limited to 2 dimensions.

I have always sought to convey a 3-D experience, and particularly with landscapes have sought to convey the fullest representation of the experience that I could.

BC-being-in-vs-looking-at-8

My Experience With the Lyve Canvas

My initial choice of the Lyve Canvas was based on several factors relating to this:

  • The subtle weave and matte finish of the canvas adds a dimensional quality, without detracting from its ability to render sharp detail.
  • Colors are rich and blacks black (great gamut and d-max).
  • There is no need for protective glass, matting, or a frame, unlike prints on paper, giving the prints on canvas a unique directness, or ‘immediacy’.

BC-being-in-vs-looking-at-5

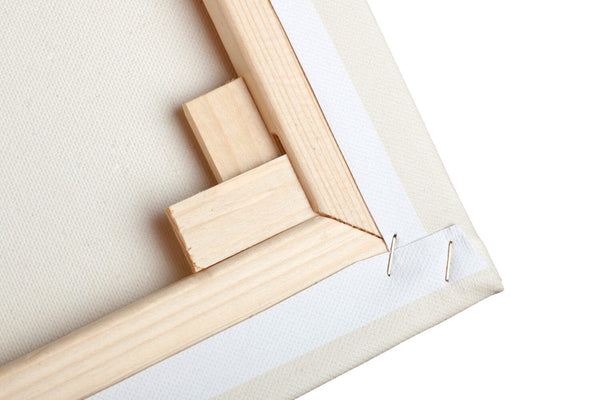
A few notes on working with Lyve Canvas and stretching on EasyWrappe Bars:

    • I generally mirror my image borders – you may choose to make them black, white, or simply wrap part of the image area. In any case, large canvases require the use of the Pro bars, which are 1.75” deep. Create your border slightly larger so that you have a little lee-way for trimming. Using a 44” Epson, your maximum image width ends up at about 40”, or 20” if using a 24” printer.
  • Be sure to select bars that are absolutely straight. At 40 -60”, any warp in the bars will make getting the canvas tight very difficult. Be sure to use stiffeners across the middle of longer prints. It is actually possible to splice bars together to make bars longer than 60” using pieces of 1/2” x 1 1/4” stiffeners to reinforce the splice. I’ve made prints up to 40 x 90” in this way.

BC-being-in-vs-looking-at-2

    • Until sprayed with UV protectant, Lyve canvas is pretty easy to scuff (before and after printing). Big prints are very tough to handle and manage without damaging them, so handle them carefully. Wait a day before spraying with matte protectant, but always spray them before stretching.
  • Stretching big prints requires a big work table – mine is a sheet of 4 x 8 mdf with a sheet of light felt applied to it. I have a small cutting mat for doing the corner trim, and generally I trim off the print margins after the wrap is completed, so no cutting mat is needed for that. Just use the EasyWrappe frame as a cutting guide and run the utility knife down the edge. For very large prints I’ll wrap the canvas around over the back of the frame, staple it, and then trim.

Closing Thoughts

When working with high resolution images of the right character, these factors combine to create prints that have an ‘immersive’ feel to them. It’s hard to describe, but they draw you in, in a way I had not seen before.

There’s a sense that you are no longer looking at a photograph, but are part of a scene. It is more like “Being in” than “Looking at”.

Any questions? I can be reached at: jbourret2@icloud.com
My website: http://jamesbourret.photoshelter.com/
My Instagram accounts: MountainImages1, james_bourret

BC-being-in-vs-looking-at-9


James Bourret Headshot
James Bourret has a background in architecture and design and began photographing 40+ years ago. He owns and operates a gallery of landscape photography in the mountain resort town of Ketchum (Sun Valley), Idaho.

His work has been published (Lenswork # 83 and others), exhibited (most recently ‘On the Trail of Ansel Adams, San Diego Natural History Museum), and is held in collections world-wide.