

How to use Select and Mask in Photoshop – learn about the different tools within Select and Mask and how to place an object into a new background.
Photoshop’s Select and Mask option puts popular selection tools with mask refinement options in one panel to give the user a “one stop shop” for creating masks of varying edge definition.
Translation: If an object has definite edges in some areas and needs a selection of varying degrees of opacity (like hair) or general focus sharpness variances within the image, Select and Mask is the way to go. It allows you to do all of these things at one time, in one place, with preview options so you can see what it’s going to look like every step along the way.
The Select and Mask option is convenient, easy to learn for beginners, and visually helpful.
More from our Popular Tools in Photoshop series:
- Puppet Warp Tool
- How to Create a Custom Pattern
- Spot Healing Brush Tool
- Healing Brush Tool
- Clone Stamp Tool
- Dodge and Burn
- Brush Tool Basics
- How to Create a Custom Brush
Where Can I Find Select and Mask?
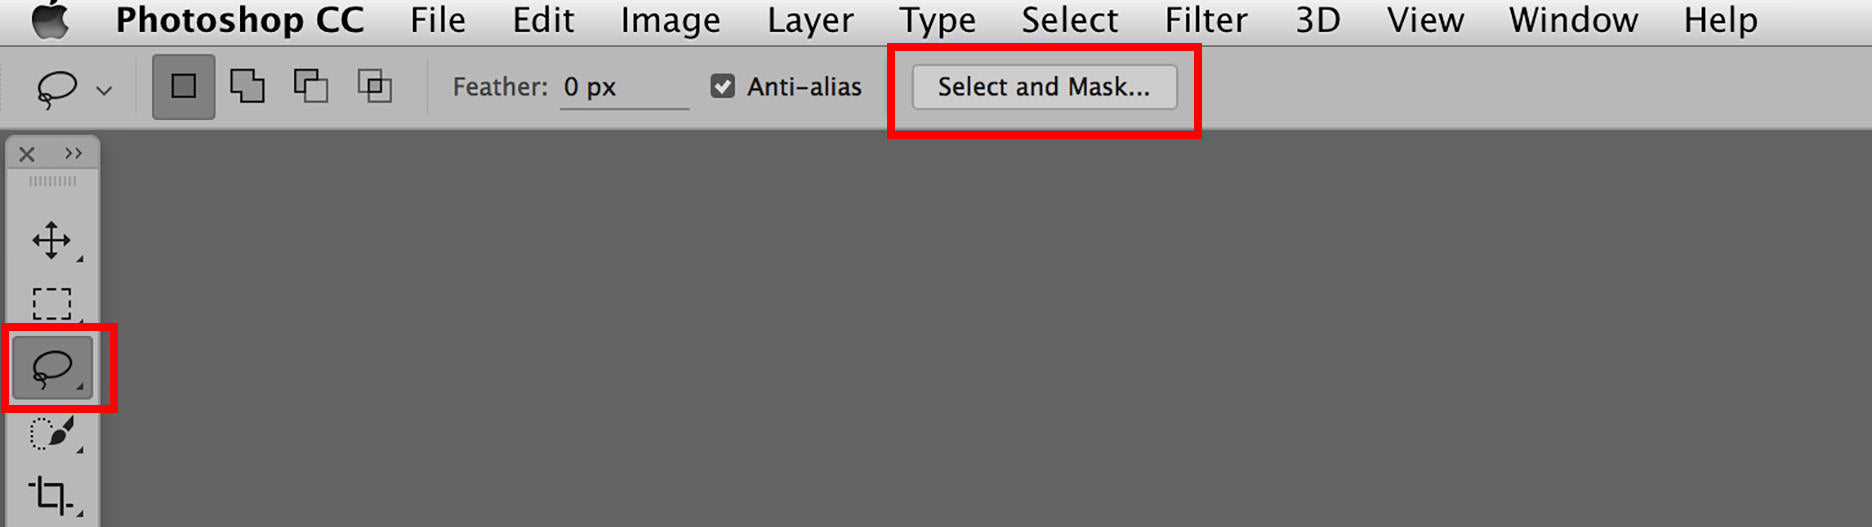
Select and Mask can be accessed via the Main Menu Bar, Select / Select and Mask.

– or from the option bar within the Marquee Tools, the Lasso Tools, or the Quick Selection Tools.
Now, let’s get started.
Using Select and Mask In Photoshop
When Select and Mask is chosen, the file opens in a New Panel that contains all of the options for using Select and Mask.
We’ll use this image from my friend, Rick Bauer. Let’s change the Background.

The original image has already been converted to a Smart Object and dragged approximately into position on the new background file.
Working with a subject that’s already pre-composed in the new background allows Photoshop’s edge detection and color fringe technology to work better because they both rely upon analysis of the underlying background.
The Smart Object status allows for multiple resizing without loss of image detail (even after Select and Mask has been utilized), to isolate the subject from the original background.
When Select and Mask is chosen in the Option Bar for the Lasso Tool, the image opens it in the Select and Mask Window.

The tools within Select and Mask are organized to provide tools on the left for making selections, a Properties Panel on the right for modifying the edge and outputting the final results back into Photoshop, and a center area where you can view and work on your image.

The Tools for Selecting are as follows:

These tools are frequent choices for making selections in Photoshop and combining them here allows the user to switch between the tools on the fly.
You can use the Quick Selection or Lasso Tool for large areas, the Refine Edge Brush Tool for things requiring wispy edges, the Brush Tool to hand paint items or create edges of varying degrees of softness, or the Hand and Zoom Tools to navigate around the image during the creation of the selection / mask.
Just click on the tool you want or use the Keyboard Shortcut to access them as needed.
Feel free to click back and forth between the tools you want to select with and use Keyboard Shortcuts for panning and zooming.
The Keyboard Shortcuts for the selection and navigation tools are:
- W = Quick Selection Tool
- R = Refine Edge Brush Tool
- B = Brush Tool
- L = Lasso Tool
- Space Bar = Hand Tool
- Z = Zoom Tool
On the right side of the Select and Mask Window is the Properties Panel.
Included here are options for viewing the selection / mask, refining it further, and choosing how to output the final selection back into the Layers Window on the image file.

Let’s look at this panel in sections. First, the View Modes.
The View Modes

View Modes offer different ways of previewing the selection / mask so you can analyze and refine what the final visual result is going to look like.
The goal is to create a selection within Select and Mask that does not require a lot of additional retouching to blend it seamlessly into the new background.
Here is the lineup of View Modes:

View Modes can be easily scrolled through during the selection / mask creation so you can see what the results will look like in different circumstances; just click on the one you want or use the Keyboard Shortcut F.
View Modes may offer additional options, such as Transparency and Show Edge for more critical previewing.
The Default View Mode is Onion Skin (Keyboard Shortcut O). Onion Skin shows transparency around the area being selected.
The degree of transparency may be adjusted using the Transparency slider. Use this View Mode to see a general view of what the image is going to look like after your work in Select and Mask.

The option to Show Edge, when the box is checked, allows for critical viewing of just the edge being created.
Toggling between this and Show Original (just checking the box) provides good “before and after” comparison so you can make sure you are getting everything you need in the selection.

The next View Mode is Marching Ants (Keyboard Shortcut M). This creates the kind of selection traditionally expected with Photoshop’s standard selection tools, like Lasso and Marquee.
Notice that the Transparency Slider is not available for this View Mode.
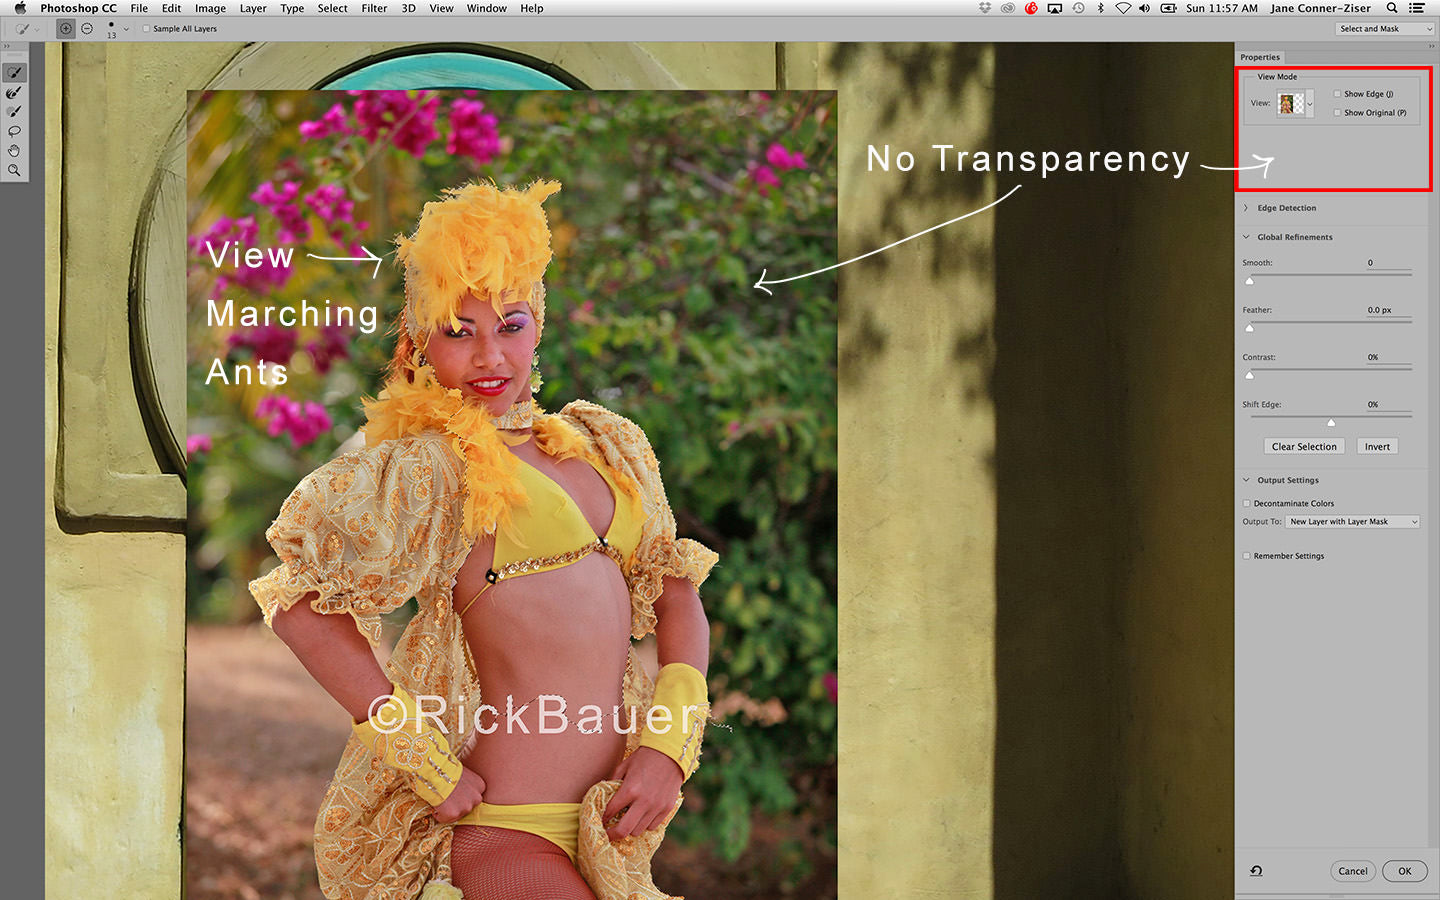
However, Show Edge and Show Original are available. This time, when Show Edge is selected, the edge plus the Marching Ants will be visible.
This View Mode is good for making quick selections of simply shaped objects – those that will not require a lot of detail, like hair.

The Overlay View Mode (Keyboard Shortcut V) presents the selection as a mask.
Viewing the selection in this manner allows you to see the mask Photoshop is creating for you as well as the image.
It is similar to painting a Quick Mask for those users who choose this method frequently.

There are options for viewing the Masked Areas, shown above, or the Selected Areas.

The Show Edge option is also available in this View Mode.

Toggling between these two options while Showing Edge provides visual information for working both sides of detailed edges to ensure that every delicate shape is included.
This is a great choice when the output will be large and you want your work to look perfect!
The next two View Modes allow you to see what the selection is going to look like against either a black or white background.
These View Modes are good to toggle between when you don’t know where the selected object is going to end up. The Keyboard Shortcuts for accessing them are A for Black and T for White.

The Transparency slider is available for both of these View Modes; I’ve got them both set to 70%, meaning that 70% is mask and 30% is image.
Show Edge and Show Original are also available for the View Mode Option.

The Black and White View Mode (Keyboard Shortcut K) is not the best choice for actually making the selection, but is a nice one for viewing the mask after the fact.
It presents the selection as if it were a Channel Mask; the selected areas are white, everything else is black.

Show Edges and Show original are available here but neither shows much detail.
I find this View Mode nice for viewing the completed mask to make sure I don’t have holes in it or have neglected to include something I need.
The On Layers View Mode (Keyboard Shortcut Y) lets you view the selection live as it will look upon the new background, provided you have pre composed like we did on this image.
Edge Detection

Under View Modes is a section for Edge Detection.
This is commonly used to help define a more exact edge after a quick initial selection has been made, perhaps the Quick Selection Tool.

It provides a Radius that can spread the edge by moving the slider back and forth.
There is also a Smart Radius check box that allows Photoshop to detail the best edge for you automatically.
When you are working quickly, using the Quick Selection Tool and then the Edge Detection with Smart Radius can help you do a lot of the work up front.
To finish the selection job, you can use the Refine Brush Tool in the areas that still need work.

When a selection has been completed, Select and Mask offers additional fine tuning options to help provide a good transition between the masked image and the new background.
Global Refinements
Global Refinements offer edge choices that will affect the edge all the way around the subject in an identical way.
When using them, be careful to compare the results in all areas of the edge because an adjustment here might be just the thing you need for one weak area in the selection, but detrimental in other areas.

- Smooth – This option rounds rough edges and can eliminate “stair stepping” around curves. It works by bringing some of the background in and some of the selected object out. Too much Smoothing results in a non-definitive, fuzzy edge so examine the global effect carefully. Smoothing is sometimes a good substitute for Feather because it doesn’t blur as much, but check them both out before making a decision.
- Feather – Feathering applies an edge blur (gradient in pixel opacity) according to the amount selected. Definite objects may not need Feathering after making the selection / mask in Select and Mask, but if you notice a “cut out” look to the object you’re trying to incorporate into a new image, start low (as low as .5 pixels) and work your way up in small increments by taking care to examine ALL of the edges. Ensure you get as much as you need, where you need it, without deteriorating a good edge someplace else.
- Contrast – This increases the contrast between light and dark on the pixels at the edge of the selection. The visual result is a sharper edge and it is a helpful option when your selection is good, but the edges in the image it’s going to be placed on is significantly sharper than those in the original image.
- Shift Edge – A great option for getting rid of dark or light haloing when the new image background is significantly lighter or darker than the original one. However, this choice can eliminate delicate feathering or hair work so be careful to examine the entire image prior to accepting this change. In the event that haloing only occurs in certain areas, resort to the Brush Tool option in Select and Mask to hand paint the haloed edges as needed just in the areas in which they occur.
Within Global Refinements, there are two additional buttons: Clear Selection and Invert.
Press Clear Selection when you want to start all over again from the beginning. Invert reverses the selection when it’s easier to select the background than the subject initially, but in the end you want the subject.
An example of this is a person who was photographed on a solid colored background.

The background will be a lot easier to select than the person because it’s a single color and value.
Invert allows you to isolate the subject by selecting the background, then clicking Invert to choose the subject instead.
Output Settings
Under Global Refinements is Output Settings.
When opened (clicking on the little arrow just left of the words Output Settings), a drop down menu offers different ways of choosing how you want the selection / mask to output onto the image file in Photoshop.

If you choose Selection, when you click OK at the bottom right of the Select and Mask Panel, the Panel will close and your selection will manifest itself as Marching Ants – ready for you to choose what you want to do within the Photoshop Workspace.
Options might be to Cut and Paste, Make a New Layer Via Copy, Add a Layer Mask, Drag and Drop the selected area onto another file, etc.
Choosing Layer Mask applies the Select and Mask work as a Layer Mask to the Layer you brought in to make the selection on.
If you only had a Background, the option applies a mask to the Background and changes the name to Layer 0.
Use this option if you are creating an image to use as a graphic on other images and need the transparent background. Save it in a format that retains background transparency, like PDF.
Retaining the Layer Mask allows you to make additional refinements as needed.
New Layer copies and pastes the selection you created in Select and Mask as a separate item on a New Layer above the Layer you brought in to the panel to work on. Sans Layer Mask; the original background will be deleted on this layer.
This option is good for production work with simple shapes or clean graphics – when you know the edge is not going to need additional refinement.

New Layer With Layer Mask takes the selection / mask back into Photoshop as a New Layer with a Layer Mask.
Use this option when your desire is to create a new layer over the one you used to create the mask – keeping the original image as is and having the ability to add hand refinements later if you need to.
If you have pre-selected something in Photoshop and now wish to utilize Select and Mask for hair refinements (meaning you already have a layer with a mask when you choose Select and Mask), the output will be a New Layer with a New Layer Mask, reflecting the changes you made in the Select and Mask Panel.
The original layer with layer mask will have the Layer Visibility turned off.
Use this option when you want to do some pre-selecting that does not utilize the tools within Select and Mask and want to use the Properties to Refine Edges and work with Global Refinements.
New Document is a choice that creates a brand new file using the selected area of the original image file as the Background, surrounded by transparency.

Use this option when creating quick graphics to use as overlays on websites, textile printing and other creative work that requires a pre-cut graphic.
If you save the file, make sure you choose a file format that will support the transparent background.
The last option, New Document with Layer Mask, does the same thing as the New Document option, but creates the new file with a Layer Mask so additional editing may be done in the future when needed.
The other option within Output Settings is an option to Decontaminate Colors.
When checked, Photoshop looks at underlying colors and tries to match the “bleed” areas of the mask edges to them.
This eliminates most of the unpleasant color problems that occur when the background colors of the original and new image are significantly different.

It is beneficial to prepare the image prior to using Select and Mask by doing some pre-composing.
If you don’t pre-compose, Photoshop only has the original background to source for color and sees no reason to change.
Last but not least is the Properties option to Remember Settings.

When you choose to Remember Settings, Select and Mask will apply all of your choices to future images, including the one you worked on, if it is reopened in Select and Mask at a later time.
It’s not a good choice to leave on by default unless you’re a production worker whose job is to make the same kind of selections on various products all day every day.
This is helpful to use temporarily for similar selections from multiple image files that do not require hand work using the Brush Tool.
OK! Let’s use Select and Mask to place the Cuban Dancer into the new background.
Placing Object Into A New Background
First use the Quick Selection Tool to make a general selection of the dancer.

Next, use Edge Detection with Smart Radius checked to get a head start on the feathers.

Then use the Refine Brush Tool to fine tune the feather work.

I additionally inspected all of the edges and used the Refine Brush Tool to try to get rid of some dark haloing around her arms.
Next, examine the mask in the Black and White View Mode.

I noticed a few areas of weakness here that I could paint in using the Brush Tool. The Brush Tool defaults with white but paints with Black when the Option (Alt) key is pressed while painting.
I determined that this image did not require Decontaminate Colors so I chose to output the finished selection as a Layer Mask on the Smart Object Layer that was originally brought in to Select and Mask.

The image and layers window now looks like this:

Next, I duplicated the Select and Mask output layer, turned the original Select and Mask output off so I could add some mask detail in Photoshop utilizing a wider variety of brush types and opacities.
I kept the original as a back up in the event of an emergency and wished to start over.
And lastly I created a New Layer on top of it all upon which I painted in my own edge details using the Brush Tool and colors that I chose from the image itself.

This is what the final layer lineup accomplished:

There is a little more definition I can add to the feathers overlapping the background, the earring, and the clothing/gloves.
While it may have been possible to spend more time in Select and Mask to ultra refine these items, it’s faster to just paint them in later.
In addition, the original image did not have all of the detail I wanted, so it was limited in providing the overlapping items that make an overlay successful.
At this point this image is ready for final size adjustments, retouching, and saving for print.

Closing Thoughts
Photoshop’s Select and Mask provides a fast and easy way to accomplish quick accurate selections for general image compositing and a head start on creating complex image masks.
It will save you some time so it’s a great item to add to your toolbox of Photoshop knowledge.

Jane Conner-ziser is an award winning photographer, digital artist, premier educator and independent consultant. With over 25 years of experience, 19 of them in digital imaging and evolving technologies, the techniques Jane developed for facial retouching and enhancement and portrait painting from photographs are widely emulated by photographers and digital artists worldwide through her classes, online training and educational products.
