

In the last article we explored the Healing Brush, how it works, and a few ideas for what it does well.
The Spot Healing Brush is similar to the Healing Brush, but there are differences in the way the tools work that result in different results.
The Location

The Spot Healing Brush is located in the Vertical Tool Bar, nested with the Healing Brush, the Patch Tool, The Content-Aware Move Tool and the Red Eye Tool.
Spot Healing Brush vs. Healing Brush
The Spot Healing Brush and the Healing Brush both allow the user to replace unwanted items with a preferred texture, color and value. Both tools average and match the destination surrounding colors and values for easy retouching.
However, the tools sample texture differently. The Healing Brush allows the user to choose a particular Source to transfer. The Spot Healing Brush does not.
Instead, the Spot Healing Brush looks outside the brushwork, analyzes the shapes there and interprets them into the retouching along with colors and values – with varying degrees of success based upon the data in the surrounding areas.

The top row illustrations show how the Healing Brush works when the chosen Source is the plain white background, using different brush sizes. The samples on the bottom were created using the Spot Healing Brush with similar brush size selections.
You can see that with the Spot Healing Brush Photoshop interpreted the squares into the retouching, attempting to disguise the artwork using texture as well as color and value.
Because the user doesn’t get to choose what is used and Photoshop doesn’t know what the image should look like, the results may or may not be desirable when working in areas that have a variety of shapes and textures.
The Spot Healing Brush is most predictable in areas of broad consistent texture, like studio backgrounds or the sky.
Spot Healing Brush Options
Brush Size
The first icon on the far left of the Option Bar is for Brush Presets. There are no default brush presets for the Spot Healing Brush, but if you decide to create some, the presets may be accessed here. The next option is for Brush Size.

This option is the same as the Healing Brush. The Size, Hardness and Spacing may be adjusted using the sliders in the upper half of the fly out menu.
The squeeze and orientation of the brush may be adjusted either by entering numerical values in the Angle and Roundness fields, or by manually squeezing and rotating the icons in the brush visualizer just left of the Angle and Roundness fields.
The bottom fly out option defaults to control Brush Size within the main size selection using stylus pressure.
This may be changed in this menu to Off, which restricts the brush size to the one chosen in the main menu, or you can choose to replicate a traditional airbrush using Stylus Wheel (for those artists that use a stylus that looks like a traditional airbrush).
Blending Mode
The option for Mode allows the user to choose how the artwork will be applied based upon Blending Mode.
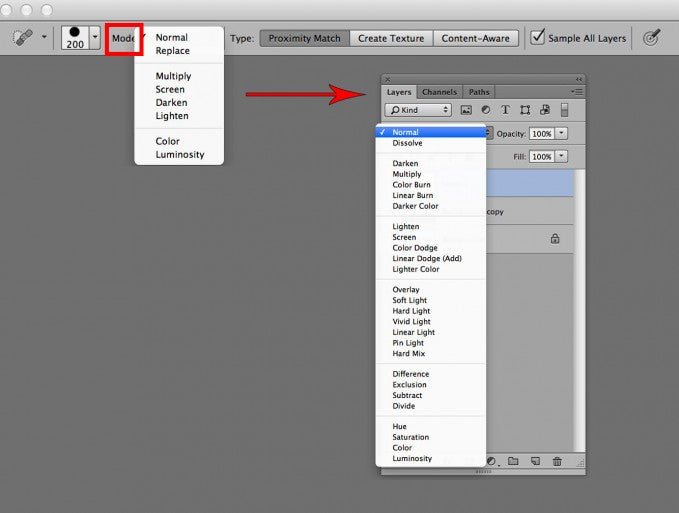
The options in the Main Menu, for Normal, Replace, Mulitply, Screen, Darken, Lighten, Color and Luminosity affect how the artwork looks. There is one mode unique to the Spot Healing Brush, Replace, which transfers a hard-edged replacement for use in creating a quick patch without feathered edges.
If you are working on a Layer, however, the Blending Mode of the Layer will override the selection in the Main Menu Bar. Since most artists use Layers, this is an important point to share.
Brush Texture
Next over are the options to tell Photoshop what Type of texture to use when working with the Spot Healing Brush. Proximity Match uses pixels directly around the area to use as a replacement.
Create Texture uses pixels within the area being replaced to create a texture.
Content Aware analyzes nearby image content and tries to replace the area being retouched as seamlessly as possible, maintaining key details like highlights, shadows and object edges.

When using any of these options the amount of area covered and the direction of the strokes affects the results so if you don’t get what you need the first time, undo it (Command/Control Z), and try again stroking in a different direction or covering more or less of the area needing to be replaced.
I’ve often experimented with each of the Types to give myself the option of picking the best Type for the job at hand.
The Spot Healing Brush reaches its limitations when used on an edge of sharp contrast. (Same as the Healing Brush)

This time the Content Aware option did a pretty good job, almost as good as the Patch Tool would do. The Patch Tool, however, will produce perfect results and is less of a gamble.
There is also an option to Sample All Layers that allows the user to create a new layer over the image file to work on.
Applying artwork to a layer over the image adds a lot of flexibility in creating artwork. Layer Blending Modes can be utilized, Layer Masks can be used and Layer Opacity can be adjusted to maximize the ability of the tool.

Control Pressure
The last option in the Spot Healing Brush Option Bar is the choice to allow the brush Preset to control pressure to size dynamics (off position) or to override the Preset and always use pressure for size (on position).

This option is helpful when the user wants to use a brush preset that dictates no shape dynamics for size but you would like to have that feature anyway.
As most of my work in Photoshop is photo retouching, I generally move between a couple of favorite basic brushes, one with pressure to size sensitivity and the other without.
For this process of working leave this option off.
The Spot Healing Brush Tool In Action
Here is an example of an image that was cleaned up and perfected using the Spot Healing Brush Tool:

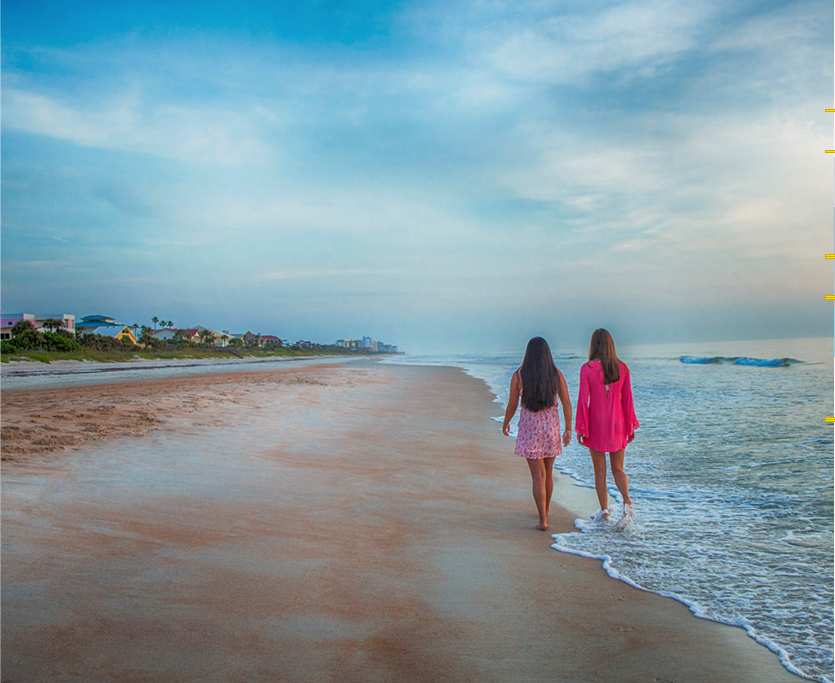
The work was applied to a layer over the image file. The sand was colored over using Proximity Match.
It did a good job because all of the rough spots were surrounded with smooth beach and Photoshop had no problem matching textures.

The beach cart, beach walkers and fisherman were removed using the Content Aware option because the areas around them had specific structures.
It did a pretty good job – there are a couple of wavy edges and rough spots but the bulk of the work was done in seconds and it will take only seconds to finish the details.

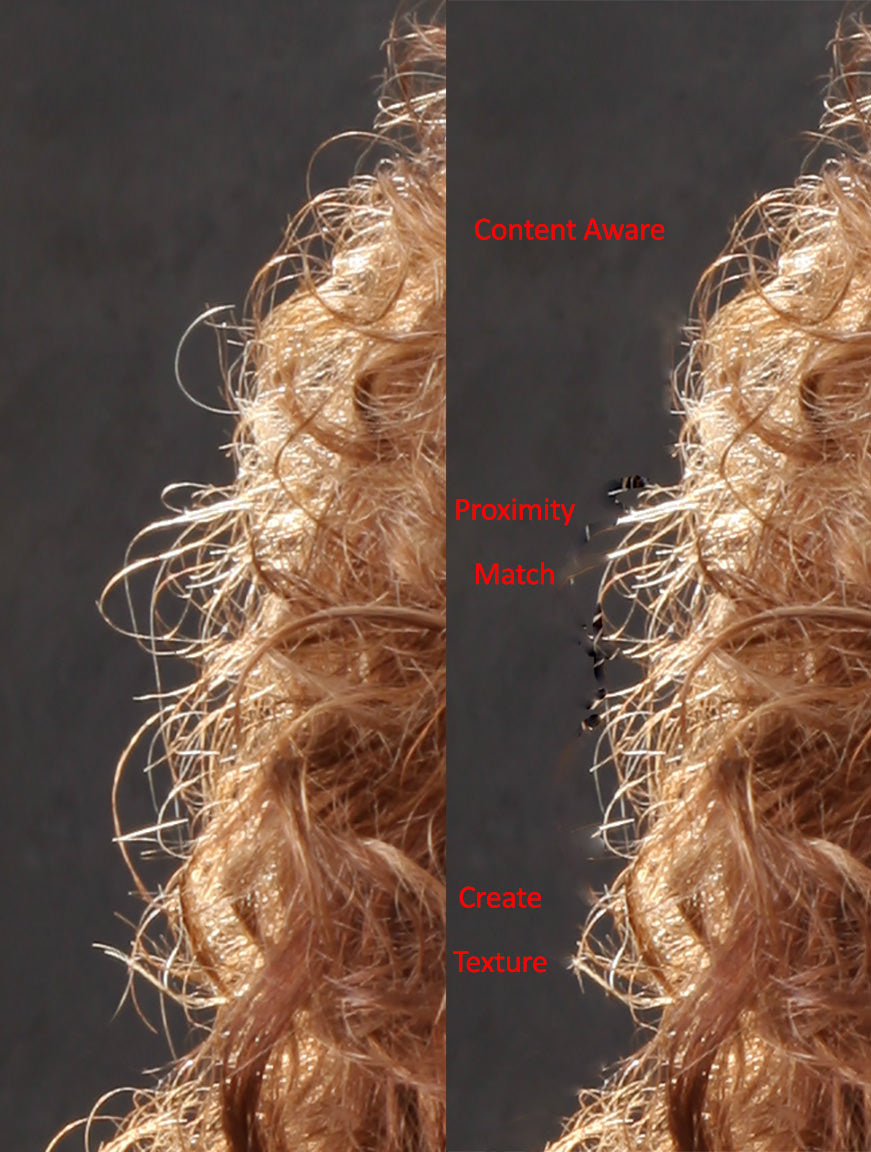
Some artists try to remove stray hairs with the Spot Healing Brush and I’ll say up front that it’s not my favorite option for this because at best you’ll get a soft fuzzy diffusion where the strays meet up with the edge of the hair (the Clone Stamp is my choice for this job), but here you can see that the Spot Healing Brush in Content Aware setting will give you the best job.
The Spot Healing Brush is a good choice for getting a head start on skin tones that have a lot of unwanted spots.
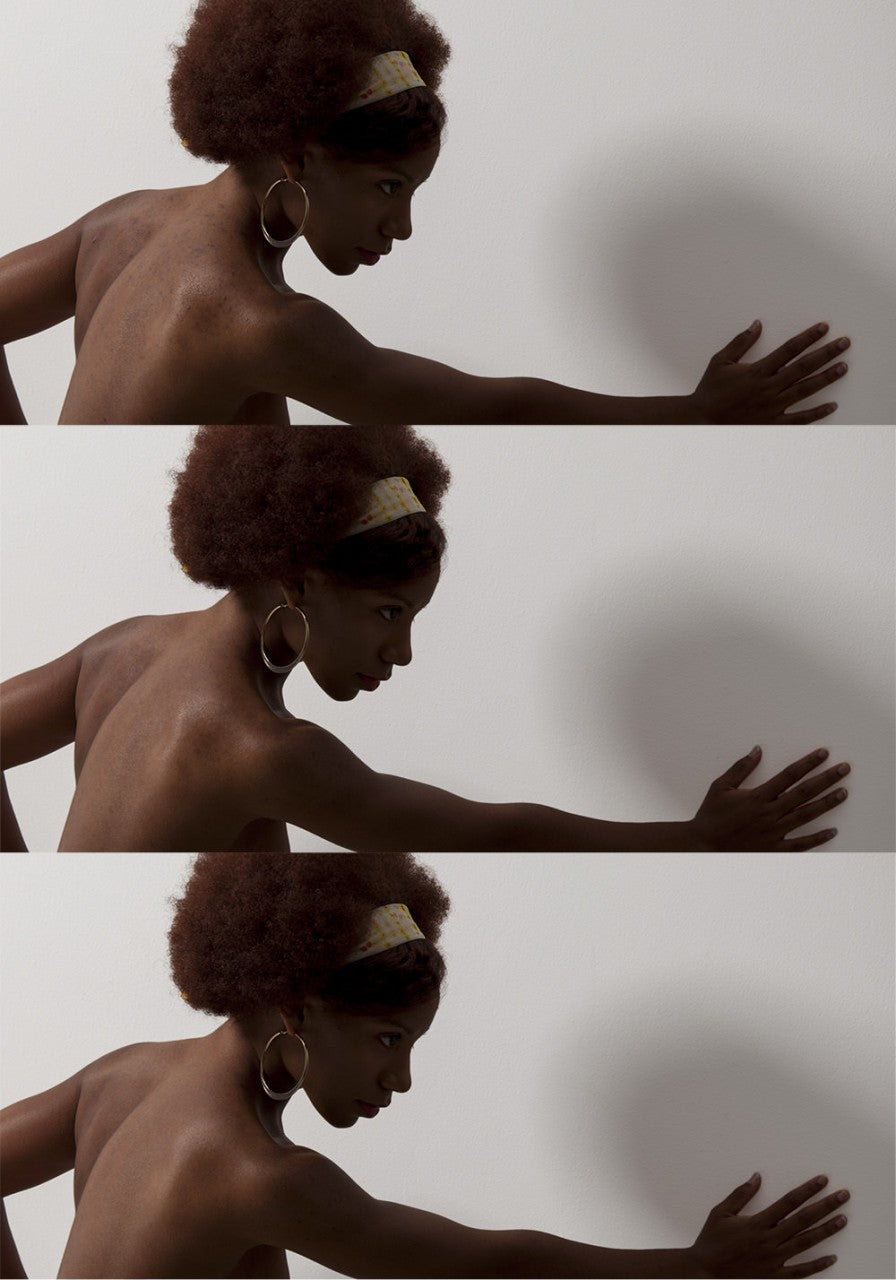
The biggest spots were easily removed with the Spot Healing Brush in Content Aware option. However the lighting contours on the body needed to be reshaped and the specular highlights picked up a lot of pore structure due to the subject’s luminous skin.
The job was completed using the Dodge and Burn Tools plus a quick soft focus filter brushed only on the rough areas.
And finally, the Spot Healing Brush is a good choice for getting started on removing acne, when there is very little smooth skin to sample.
It doesn’t do the entire job for you, but it will save some time on the big spots.
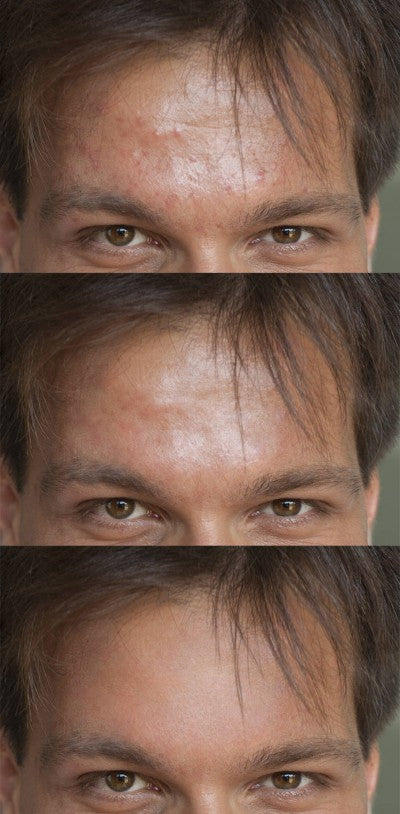
In this example, the spots were removed using the Healing Brush in Create Texture Type.
From there the delicate discolorations from the swollen skin around the blemishes were retouched using the Dodge and Burn Tools and the oily specular highlight was reshaped and toned down using a combination of the Paintbrush Tool in both Normal and Color modes, plus additional Dodging and Burning.
The result is complete removal of the acne while retaining natural pore structure for believable skin texture.
Wrapping Up
The Healing Brush technology is sophisticated and easy to use.
Knowing the strengths and weaknesses of each of the tools in Photoshop puts the power of creating exactly what you want in the best and most efficient ways right in your fingertips.
Choose tools like the Spot Healing Brush and the Healing Brush to solve small spot problems and to give you a head start on more difficult jobs that will ultimately require a combination of tools.

As with all work in Photoshop, it’s good practice to work upon layers as much as possible and merge them down when you are satisfied with the work. I create a Background copy initially to merge artwork on to so I can maintain an original within the file.
When the job is completed, I save a PSD with the original Background, the Background copy with merged artwork and perhaps a few layers above that might have Black and White or other special effects as an option.
I then flatten the file and Save As, giving the finished piece another name reflecting that it is the finished file, and I save it as a TIFF.
While it’s quite similar to the Healing Brush Tool, the Spot Healing Brush Tool has its own unique uses. For more Photoshop Tool tutorials, check out some of my other articles in the box below.

Jane Conner-ziser is an award winning photographer, digital artist, premier educator and independent consultant. With over 25 years of experience, 19 of them in digital imaging and evolving technologies, the techniques Jane developed for facial retouching and enhancement and portrait painting from photographs are widely emulated by photographers and digital artists worldwide through her classes, online training and educational products.
