

Many Photoshop users don’t have access to other programs that allow them to combine type with images, such as Adobe InDesign.
Adobe knows that many people use Photoshop to create text-and-image documents, and has expanded the type tools available to Photoshop users.
In light of this, I’ve started the “Photoshop Typography” series to help you make your type in Photoshop look professional.
In my first post, I touched on some highlights of fundamental good typesetting.
In this post, I’m focusing closely on the tools available in the Character panel and will explain some of the mysteries of good type as I go along.
The Character Panel In Photoshop
Open Character panel by going to Type Menu → Panels → Type Panel.
You can also type Cmd/Ctrl-T to open the window. All sorts of type choices and options become available to you through this window.
It’s time to go exploring. I’ve numbered various areas to draw your attention.
#1 – Select A Font

Pick the font you want by clicking on the name of the font at the top left of the panel – the screenshot is currently showing Helvetica Neue.
Click on the downward pointing arrow at the right of the box to see the whole menu of fonts currently available, or put your cursor at the front the field and type the first few letters of the font name you want.
Photoshop will automatically display the font you type from the first few letters.
By the way, if you have a font you want to install and use, you can install it at any time, and do not have to restart Photoshop to use the newly installed font.
When you install a new font, you may notice that Photoshop will hesitate a second or two the first time after installation when you click on this menu, while it updates its inventory of available font choices.
This is normal, and certainly nicer than having to restart.
#2 – Pick A Specific Style Of Font

Across from the font’s name, you pick the specific style of your font; e.g. Bold, Light Italic, etc.
You can click and hold to see all the options in any installed font family.
This is useful when trying to use varying weights and widths to provide visual contrast while using only one or two font families for a polished final document.
Each option is previewed using the word “Sample” next to the name, so you can compare.
You can also select a block of type, then put your cursor in the Styles box and move up and down using the arrow keys to compare styles, as Photoshop automatically applies the type to your selection to show you a preview of how your type will appear.
This tip of using arrows to raise and lower values in a box applies to all the boxes in this panel, not just this one.
#3 – Pick A Type Size

Pick the size of type you want here. By default, the number refers to points (pt). There are 72 points in an inch.
You can also type in other units of measure, such as 1 inch, and Photoshop will figure out the exact equivalent point size and show the result in points.
You can choose one of the preset type sizes in the pulldown, such as 18 pt type, or key in a custom size.
You can use the arrow keys to raise or lower the point size simply by selecting the number in the point field, then tapping on the up and down arrows.
The entire selection of highlighted type will change size as you use the arrows.
#4 – Set The Leading

This field sets the leading, a term meaning the space between each line. It’s a legacy of when all type was set by hand, and the metal strips used to separate each line of metal type were made of lead.
You can either keep the leading value set to automatic or set a number.
By default, the automatic leading setting is 120% of the type size you choose. So, if you choose 30 point type, the automatic leading will be 36 points.
This default can be changed permanently in Photoshop by opening the Paragraph Panel, selecting Justification from the flyout menu, and changing the value from 120% to something else.
We’ll talk more about the Paragraph Panel later.
If you’d like a bit more or less space between lines, for effect or to enhance legibility, you can set a specific number, such as 30 points with 42 point leading, sometimes written as 30/42 (thirty over forty-two).
For best results, every single space and character in every line you want to change must be selected first, before you change the leading value.
#5 – Set The Kerning

Metrics vs. Optical lets you select between two different ways of spacing between type automatically. To see what they do, select a block of type, and click on the pulldown arrow.
Click on Optical. Most of the spacing will change and frequently will result in a more pleasing arrangement of your type.
I almost always use Optical, but will always check Metrics to see if I like it better.
Regardless of which you choose, it’s important to check individual kerning pairs in your type to make sure each pair works well.
This is particularly important when working with inexpensive fonts, as the quality of each font’s kerning depends on how much care and time type designers invest in building the spacing between each pair of letters.
#6 – When Needed, Change The Tracking

This box lets you change the spacing between individual letters, using the tracking control.
Font designers build numerical spacing values into their font designs to provide automatic tracking, varying spaces between letters proportionately, helping the different shapes of letters fit together in the most balanced fashion.
Many Photoshop users will never need to touch this box, but people who are persnickety about type often use this to adjust the spacing between individual letter pairs.
Not all fonts are created equal, and you may find the particular font you’re using doesn’t have perfect automatic kerning.
In my own case, I frequently need to adjust kerning in my last name.
It seems to be a challenge to space the O, the apostrophe and the C of O’Connor correctly in many fonts, so I adjust the kerning pairs manually to tighten up or loosen the space between individual sets of characters for best results.
For a specific size and style that I’ll use often, such as putting my name on a print, I’ll make the properly kerned type into a brush that I can use to click once to stamp my name, elegantly kerned, whenever I need it.
#7 – Scale Fonts With Type Height

Type height can be scaled up or down as a percentage of its originally-drawn height in this window.
You should be very nervous about doing this more than a couple of percentage points either direction; this is a prime case of “Just because you can, doesn’t mean you should”.
This tool is usually reserved for making something fit into a specific space, but most people experiment with stretching type vertically at least once in a while.
When you do so, some fonts will scale much more attractively than others, as shown in the sample below.
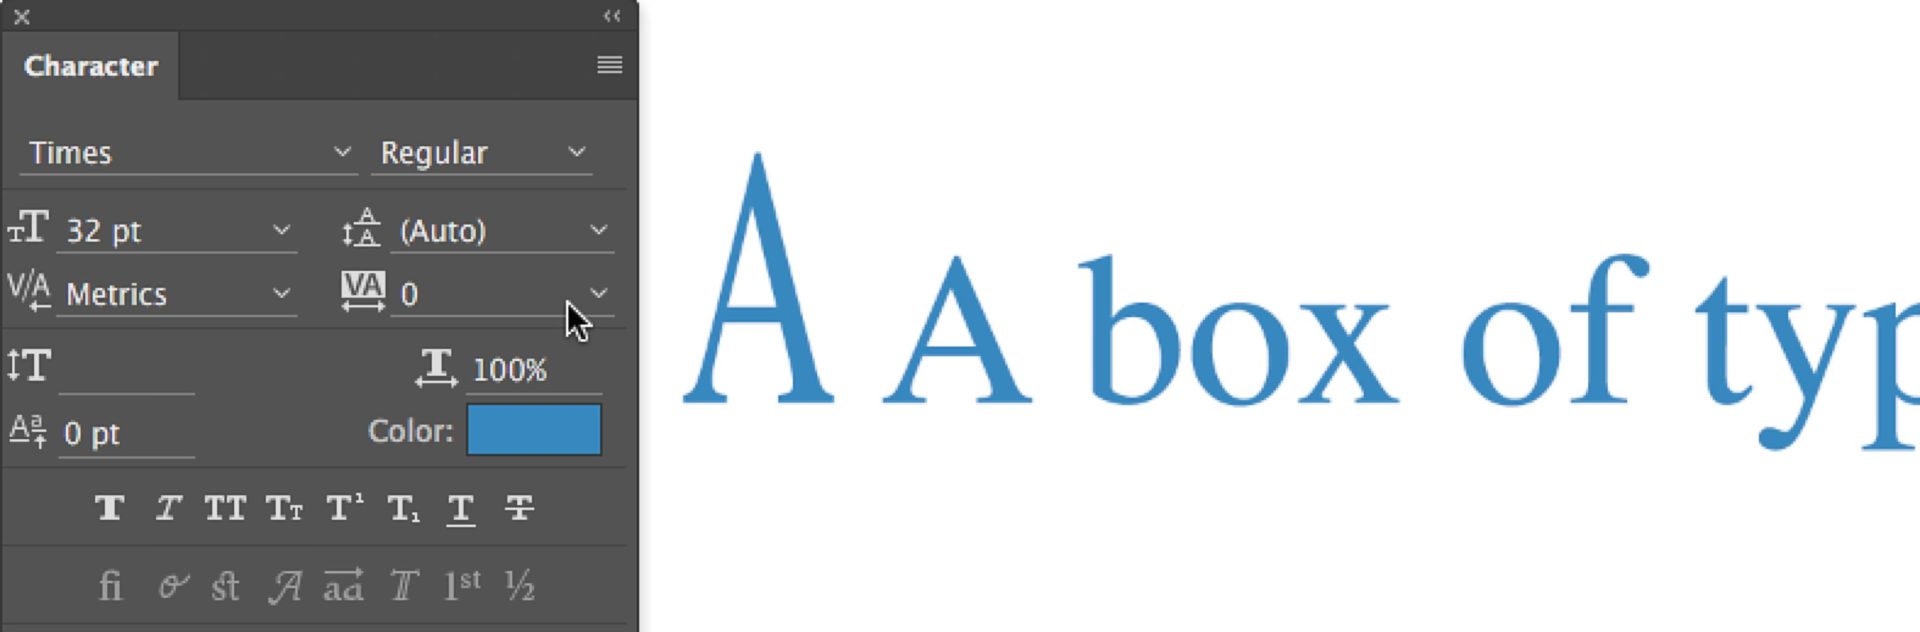
The comparison to the original size A shows the more slender appearance of the stretched A, though a closer look at the serifs (the little cross bars at the bottom of the letter) shows they didn’t scale correctly, and look a bit heavy.
Many letters look much worse when scaled this way. Still, always approach this tool carefully.
#8 – Scale Fonts With Type Width

The width of the type can be scaled in the same way.
In my experience, it’s more common to see artists scaling type horizontally to make type fit than to scale it vertically, and only after they have tried using the two tools directly above in this panel, usually setting Optical kerning and then tightening up tracking.
When adjusting the fitting between individual letters or in entire paragraphs doesn’t quite make the grade, a couple percentage points wider or narrower can be applied without being too obvious.
Here, the same 171% previously applied to the A for height makes a very wide letter, compared to the normal A just before it, and the scaled A before the normal A.

As an alternative to scaling your type wider or narrower, some font families include Extended or Wide versions, in addition to normal.
These deliberately-drawn wider or narrower versions of glyphs show good balance and aesthetics and are visually preferable to using Photoshop to scale a letter for effect.
The best thing to do is to check the font you have already first, by clicking on the type styles pulldown menu identified with a 2 below.

When you do this, all the styles available in a particular font will appear for you to choose, and you can see if you have condensed or expanded versions of a particular font you like, as shown in the screen capture below.
In this font, an Extended set is also available, though I don’t have it installed on my computer currently.
If you don’t have any fonts that offer Extended or Condensed character sets, you have access to various options.
Your monthly Photoshop subscription includes access to a wide selection of fonts in various styles, varying depending on which subscription you have.
To find new fonts included in your monthly subscription, you can go to the first field at left in Photoshop’s Character Panel, where the current font name is displayed.

Click on the arrow to the right of the name of the font menu to display all available fonts, and then click on the area outlined in red in the screenshot above.
When you do this, your default browser will open, and you’ll be connected to an Adobe selection window offering a variety of typefaces.
At the right of the screen, you’ll see a panel allowing you to select by style, as shown in the screenshot below, so that if you are seeking fonts with extended styles, or condensed styles, you can search using specific criteria just by clicking on the buttons.
In the screen capture, I’ve selected Serif fonts and extended (wider) characters.

Various font families will be presented, and the larger the number of fonts in the family, the more variations you can choose.

Thus, in the screen capture above, the font Matrix II has 23 styles, while the font Realigned has only 7 styles. More options are usually better.
#9 – Adjust With The Baseline Shift Tool
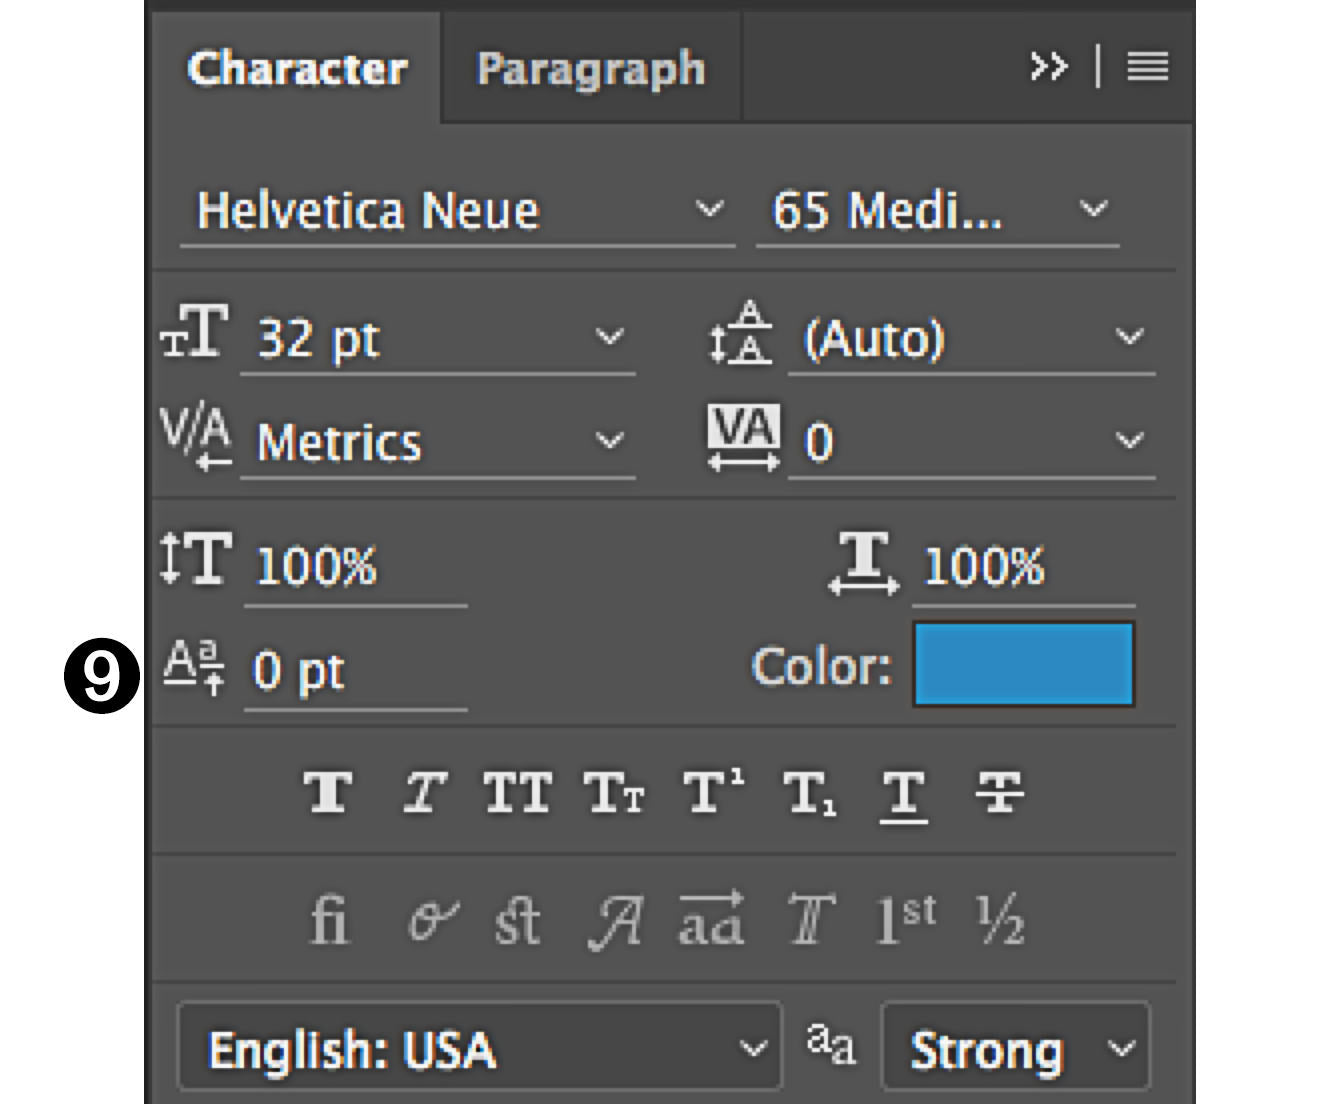
The Baseline Shift tool lets you select one or more characters to move up or down relative to the baseline.
Some people use this tool to make a line of type go exactly where they want it, instead of fine-tuning leading for this line or this block of type.
This should be done sparingly, if at all, so that if you need to make changes you’re not having to change a whole bunch of baseline adjustments after changing.
Other times, the tool is used to move a single character to adjust it for visual perfection.

In the sample shown above, I’ve added a bullet using ITC Eras, a font which has a squared-off bullet shape I like to use, but with a slight change.
The bullet sits a bit high for my taste relative to the baseline, so I’ll move it down using the baseline shift tool, visually balancing it against the letters.
I may use the arrow keys to test moving it up and down to see the effect of one or two more points up or down.
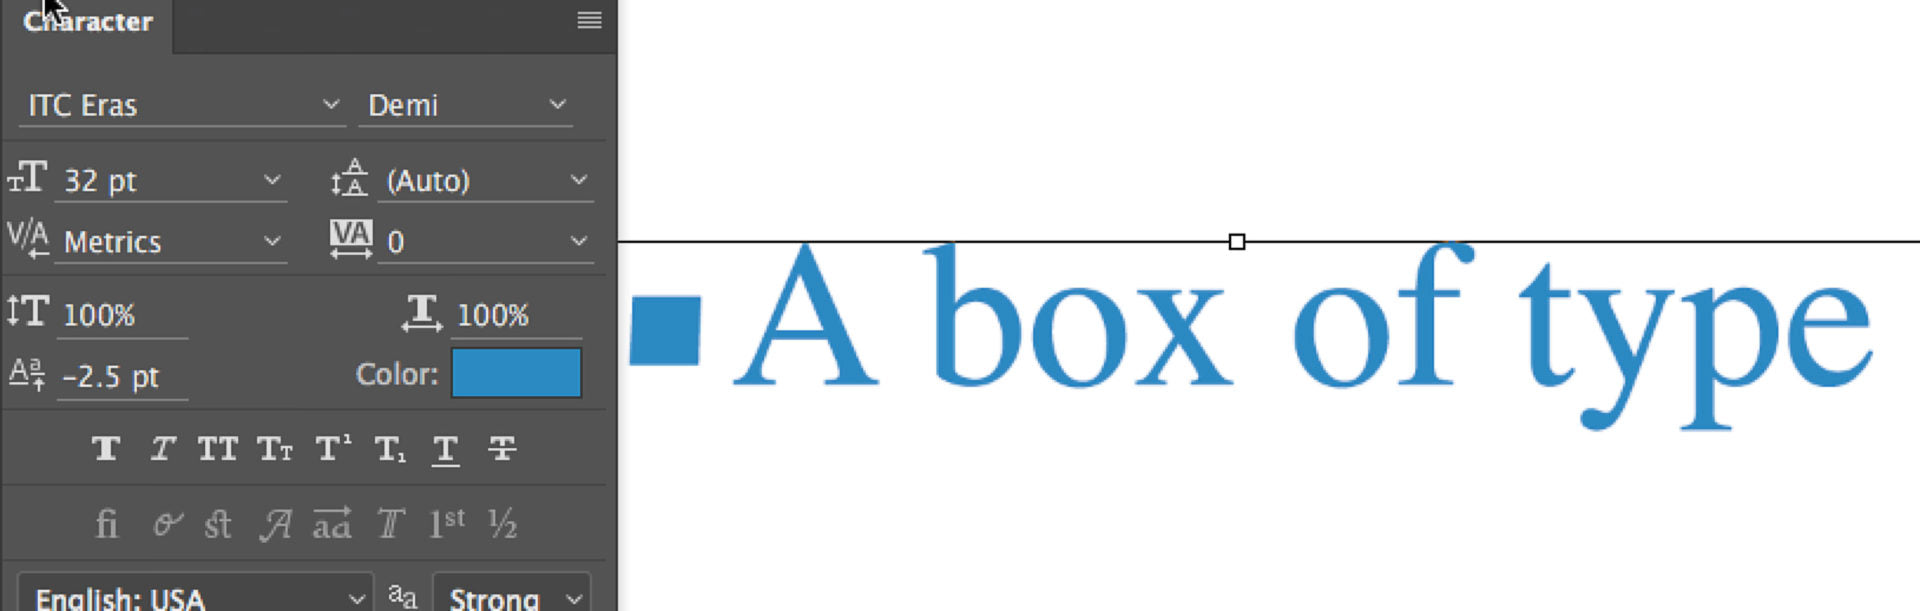
In the screenshot above, I’ve applied a negative value of 2.5 points to the highlighted bullet, which moves it down, the better to balance its center with the cross-stroke of the A and the center of the lower case characters in the whole line of type.
I think this looks nicer, as shown above (some type lovers will disagree).
#10 – Modify Type With The Color Box

The Color box lets you modify a selection of type, from one character to all characters, by highlighting the text you want to change, then double-clicking on the Color box to select any color you desire for your text.
You can select a color by clicking on the big square showing various shades of color, or on the slider to move the color range to a range of color more to your liking.
In addition, if you have specific color values required for a particular job, such as logo colors, you can type them into the various color systems shown (HSB, RGB, Lab, or CMYK).
Remember to set your color profile correctly for your document, in order to be sure your color matches.
For example, a set of CMYK values typed into one profile’s document may deliver a different red when typing into a different document with a different color profile.

In the example shown, I selected text in blue, and then chose a bright red.
The new color box at the top displays a warning that the color selected is outside the printable gamut of the color selected, by showing a triangle with an exclamation mark in it next to the new color’s box.
Your options are two: if the current profile is required for use, pick a different shade that will not trigger the gamut warning, or assign a different profile with a larger gamut, if this is permitted in your workflow.
Assigning a different color profile in a workflow that won’t honor it correctly is usually disastrous, so if you are preparing files to go elsewhere, it’s important to be sure the recipient of your file will be able to print using the newly-assigned profile.
Check with the print provider for their requirements to be certain you’re giving them an optimal file for best results, and be sure your choice of a different profile doesn’t change the image in ways you don’t like.
Sometimes, it will be necessary to convert the image to the new profile (Edit Menu → Convert to Profile → select the profile and use Relative Colorimetric rendering intent to convert) before picking the color you want to use.
Up Next: Part Two

In part two of Photoshop Typography: Elements of the Character Panel, I’ll go over the additional type controls in the character panel. We will look at the Faux Styles and OpenType options.

Kevin O’Connor helps design and test software, is a graphic designer and photographer for multiple clients and companies, and fixes people’s (and companies’) color.
He has consulted to multiple companies, including Apple, Sony, Fujifilm USA, and X-Rite. He loves teaching good color practices to enthusiastic learners.
