

How to print on third party paper and best configure printer settings to match.
In the digital age, we are fortunate to have a bounty of wonderful inkjet papers to choose from.
These papers range from glossy, luster, metallic and baryta photo papers, to fine art cotton watercolor and canvas matte.
A few of the choices include OEM papers offered by printer manufacturers such as Epson and Canon, as well as third-party (non-OEM) papers produced by companies such as Breathing Color.
Color-managed applications like Photoshop and Lightroom, in conjunction with quality ICC printer/paper profiles, pave the way to achieving good prints.
Producing an optimal print, however, requires proper configuration of an array of printer driver settings for each particular paper.
Introduction
Since Epson and Canon sell branded papers designed to work with their printers, media settings are only programmed into the printer driver software for those papers.
When choosing a OEM media (paper) type in your Epson or Canon printer driver, the software automatically determines and configures the optimal settings for the selected paper. While this keeps the printing workflow fairly straightforward for OEM papers, it presents certain challenges when printing on third-party papers since paper characteristics such as coatings, weight and thickness widely vary.
When printing on non-OEM papers, there are several important settings that may need to be manually configured in your printer driver dialog box in order to avoid common problems and ensure optimal prints. These settings include (but are not limited to): media (paper) type; platen gap (Epson) or head height (Canon); and paper thickness (Epson).
In this post, we will review these often overlooked settings when working with third party paper or mixed media paper and discuss the differences between them. At the end of the post, I will go over how to calculate proper paper thickness settings for Epson printers based on caliper specs from manufacturers’ paper data sheets. Let’s begin by first addressing common areas of confusion: ICC profiles and media types.
About ICC Printer/Paper Profiles
The proper application of quality ICC profiles is one of the most critical elements in the printing workflow. ICC stands for International Color Consortium, a group of industry vendors/color experts who first established the standardization of an open, cross-platform, color management system.
Simply put, these profiles (small text files) contain instructions on how a given make and model of printer, using a specific ink set, should spray ink on a particular paper to achieve color accuracy. They are created by printing numerous color swatches on the paper to be profiled, measuring the swatches on a device such as a spectrophotometer, then comparing the results to known reference targets and making necessary corrections to achieve color fidelity from input to output.

Matching a Paper Type With an ICC Profile
Photo papers (glossy, semi-glossy, satin, luster, pearl, metallic) and matte papers (cotton, canvas, alpha-cellulose, bamboo) have many different surfaces – a cotton paper will absorb ink much more readily than a glossy paper.
Even within a given category (photo or matte), paper coatings vary widely as does the surface texture, or tooth, of the paper. For example, some cotton papers are very smooth (hot press papers), while others have more texture (cold press papers). Thus the need for ICC profiles specific to each printer, paper and ink combination. More on this in the media type section below.
When you purchase a photo inkjet printer, the manufacturer will supply you with a set of ICC profiles for the papers they make. These are referred to as generic or ‘canned’ profiles, as they are not optimized for your particular hardware and software, but still render good prints. In addition, there can be some drift between the same make and model of printer. If you wish to use third-party papers from manufacturers such as Breathing Color, you will need to either download the appropriate ICC profiles from their website, or make your own custom ICC profiles.
Keep in mind when using third-party papers you need to install ICC profiles for each printer/paper/ink combination you will be using.
Sometimes the download includes packaged profiles for all papers from a given manufacturer, while other times you must download each profile separately. Be sure that the profiles are installed in the correct folder before launching your image editing program.
Breathing Color ICC profiles, along with installation and printing instructions, can be found at: Support Tab > ICC Profiles and Support Tab > Print Instructions

About Media (Paper) Types
Just as important as ICC profiles and critical in making them are so-called media (paper) types. As discussed above, there are two main categories of papers: RC photo papers like glossy or luster that use photo black (PK) ink; and matte papers like smooth or textured cotton that use matte black (MK) ink.
Each paper absorbs ink differently depending on its coating and surface texture. Matte papers are much more absorbent than photo papers and exhibit a phenomenon known as ‘dot gain’ due to ink droplets spreading out into the paper. This is the reason why matte papers have overall lower resolution and black ink density (Dmax) compared to photo papers, and why ICC profiles take into account whether photo or matte black inks are used to build the paper profile.
When printing, the media (paper) type settings are accessed from your printer driver dialog box via a drop-down/fly-out menu. Issues arise when deciding which media type to choose when printing on a third-party paper, as the only ones available in the driver will be those sold by the printer manufacturer, of course.

For example, what Epson media type should be selected when printing on most Breathing Color cotton papers on Epson printers? Answer: Epson’s Watercolor Paper Radiant White (WCRW), according to tests run by Breathing Color.
Fortunately, third-party paper manufacturers provide this information on the paper data sheet or handling instructions. They determine the closest match (at the time) to the OEM inkjet paper coating when creating ICC profiles for each printer/paper/ink combination. So it is critical to use the suggested media type to get an excellent print if you are going to use the manufacturers’ profiles.
When making your own custom ICC profiles, you’ll want to experiment with different media type settings to optimize results. Below is a sample table with appropriate Canon OEM media type settings to be used with Breathing Color papers:

The problem arises when the suggested media type for a non-OEM paper – although maybe accurate in terms of matching the paper coating – varies widely from the OEM paper in other characteristics such as paper weight and thickness. We will address these mismatches in the platen gap and paper thickness sections.
In addition, due to the fact that printer manufacturers are continually releasing new papers, it is possible there is a more accurate media type match for a third-party paper. Newer papers may not have been available at the time the non-OEM ICC profile was created. That is why you may want to experiment.
We will next make sense out of these often cryptic profile names provided by paper manufacturers. A handy chart containing abbreviations for suggested OEM media types for use with Breathing Color papers, along with an explanation of acronyms used in Breathing Color ICC profile naming conventions, is shown in the next section.
Making Sense Out of ICC Profile Abbreviations and Acronyms
Have you experienced frustration when trying to select the proper ICC printer/paper profile for the paper you wish to print on in Photoshop or Lightroom?
Either the drop-down menu is so long it nearly falls off your screen, or the profile acronyms used by paper manufacturers require interpretation by a rocket scientist. Fortunately, Breathing Color has made things simple by clearly defining their ICC printer/paper profile abbreviations in the below referenced media type chart. Let’s take a look.
Below is the media type and profile abbreviation chart provided by Breathing Color for Epson and Canon printers. In the Breathing Color file naming convention, there are essentially five critical pieces of information in the following order: paper manufacturer (noted as BC); Breathing Color paper product; printer model; whether the profile is to be used with photo black (PK) or matte black (MK) ink; and the appropriate OEM media (paper) type to select in the printer driver dialog box.
EXAMPLE 1: Here is the abbreviation for printing on Breathing Color’s Vibrance Gloss Paper on a Canon iPF 6300 with photo black ink, and selecting a Canon OEM media type of Premium Glossy Paper 280:
EXAMPLE 2: Here is the abbreviation for printing on Breathing Color’s Pura Smooth Paper on an Epson 3880 with matte black ink, and selecting an Epson OEM media type of Watercolor Paper Radiant White:
BC_PuraSmooth_3880_mk_wcrw
EXAMPLE 3: Below is Epson’s profile naming convention for printing on Cold Press Bright White Fine Art Paper (CPBWFAP) on the Stylus Pro 3880 printer, using matte black ink and printing at a resolution of 1440 dpi (printer resolution, not image resolution):
SP3880 CPBWFAP MK 1440 v1
There are several things worth noting here: First of all, note the v1 annotation at the end, which means this is version number one of the profile. Sometimes these profiles are remade, so you should always check back on the manufacturer’s website to be sure your profiles are up-to-date.
Also be aware that there is a second distinct profile available for the same paper, printing at a resolution of 2880 dpi. Be sure to select the correct profile for the resolution at which you will be printing. Finally, note there is no ‘media type’ listed at the end of the name, since you would be using Epson OEM paper, selecting CPBWFAP.
Examples of other paper acronyms include CAMC for Canon Artistic Matte Canvas; UPPPL for Epson Ultra Premium Photo Paper Luster; and so on.
Here is how Example 2 above looks in Photoshop CC’s print settings dialog box:

What is a Platen Gap?
Here is where the rubber meets the road, when there is a significant weight and thickness mismatch between the suggested OEM media type and a third-party paper. In this section and the next, we will review how to resolve potential printing problems due to differences in paper thickness.
The platen is a long narrow strip running across the width of the printer at the point ink is fired from nozzles. The platen gap is simply the distance between the bottom of the printhead (where ink is ejected) and the surface of the paper.
On Epson printers, the term platen gap is used and adjustments to this gap can be made either in the printer driver dialog box or on the printer itself via the LCD control panel. On Canon printers, this is called the head height and is adjusted directly on the printer.
Pro Tip: Always be sure you are using the most current printer driver software by frequently checking your printer manufacturer’s website, especially if it has been awhile since you purchased your printer.
When printing on thicker papers, this gap is naturally narrowed and may need to be increased. Conversely, when printing on very thin papers, the gap is naturally widened and may need to be decreased. The key is to determine the optimal gap to use for each third-party paper. This information may, but not always, be included with non-OEM paper printing instructions, but is taken into account when building ICC profiles.
Some problems that can occur with incorrect (too narrow or too wide) platen gap settings include the following:
- Paper scuffing as the printhead rubs against the surface of the paper (too narrow a gap)
- Head strikes when the printhead slams against the edge of the paper (too narrow a gap) – note that this can permanently damage the printhead
- Horizontal banding on your prints
- Ink overspray or puddling – or ink splotches on the surface of the paper
- Poor resolution and sharpness (too wide a gap)
- Inaccurate ink drop placement due to ink drying on the way down if the gap is too wide
- Contamination of the bottom of the printhead with paper fibers due to scuffing, which can fall off and leave white spots on a print (too narrow a gap)
- Ink transfer to the bottom of the printhead which can dry and lead to more paper scuffing, color splotches on your prints and even clogged nozzles (too narrow a gap)
With Epson printers, the platen gap works in conjunction with the paper thickness setting, although they have somewhat different functions and can be adjusted separately. Both settings are automatically configured for Epson branded papers of course, but may need to be adjusted for third-party papers in the printer driver dialog box.
You may notice in the dialog box that the platen gap is often set to Auto, which is fine as long as you are printing on Epson papers. Or in cases where OEM and non-OEM papers are a close match in weight and thickness.
Since the platen gap controls the printhead height relative to the paper, adjustments compensate for paper thickness at that location inside the printer. However, according to Epson, the paper thickness setting relates more to the printer feed/transport mechanism itself and how the paper is fed into, through, and out of the printer by sets of rollers. Epson claims vertical banding and paper feed or skewing errors may result; therefore, users are able to customize adjustments to paper thickness separately from platen gap adjustments.
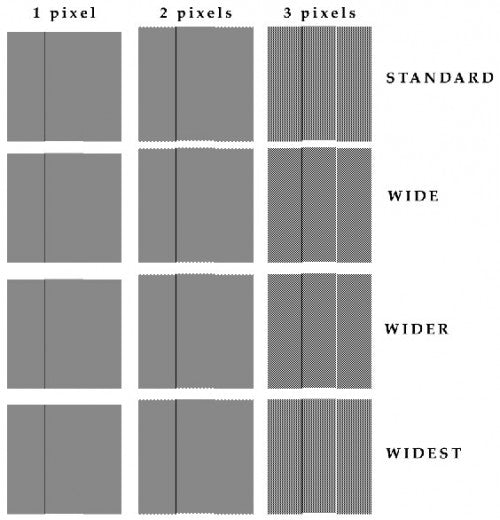
Below is a table with approximate platen gap settings for Epson printers based on paper weight in grams per square meter (gsm). Please consult your printer manual or technical support for Canon printers on making adjustments to the head height. These Canon settings may be called high, higher and highest on certain models.
Note that these settings are not exact and require experimentation – they are only a starting point. Depending on your printer model, some but not all of these platen gap settings may be available. Please also see the important caveat below the table.

An important caveat to this table is the following critical fact: There is not an exact correlation between paper weight and its thickness. Some thicker papers may weigh less than their thinner counterparts, while certain thinner papers may weigh more than their thicker counterparts. To demonstrate this important fact, I will show comparisons between two Breathing Color papers that are close in weight, but differ substantially in thickness – Elegance Velvet and Vibrance Baryta.


Examining these specification data sheets, you can see that these two papers are approximately the same basis weight – 310 and 345 gsm. However, the Elegance Velvet is much thicker at 23 mils than the Vibrance Baryta at 14 mils. If you study spec sheets from other paper manufacturers, you will also see this pattern of non-correlation between weight and thickness.
Let’s now look at why this is especially important when selecting an OEM media type for a third-party paper. I will demonstrate printing on an Epson 3880 with Elegance Velvet paper. For Elegance Velvet, Breathing Color recommends using the Epson media type setting for Watercolor Paper Radiant White.
The rub is that WCRW is a much lighter and thinner paper than Elegance Velvet, with a weight of 190 gsm and thickness of 11.5 mils. Therefore, if adjustments are not made to the Epson 3880 platen gap and paper thickness settings when printing on Elegance Velvet, problems may likely occur.
Here is what the default Epson driver dialog box (advanced media control) looks like before any adjustments are made when programmed for Watercolor Paper Radiant White:

Remember, your printer will automatically adjust these settings based on the media type you select in the printer driver dialog box. In this case, because directions are sent to the Epson printer that WCRW is loaded when in fact Elegance Velvet paper is, you must at least widen the platen gap setting to account for the thickness difference.
Pro Tip: Even though the weight of Elegance Velvet is 310 gsm and I would normally select a platen gap of wide – due to the extreme thickness of 23 mils – I am choosing the Wider setting instead, which is as high as I can go on the Epson 3880.
Here is what the same driver dialog box looks like after the correct Platen Gap setting of Wider is applied for Elegance Velvet:

How Do I Know What Paper Thickness Setting to Use?
This section applies to Epson users, as I am unaware there is a comparable setting for Canon printers separate from the head height adjustment.
If you wish to adjust the paper thickness setting on your Epson printer, you need to find out what the caliper (thickness) specs are for the paper you wish to print on. Refer to the paper data sheet supplied by the manufacturer or look at the specifications printed on the outside of the paper box. In the above section, I showed excerpts of Breathing Color paper specification data sheets with this information circled in red.
On these data sheets, specifications are provided for both the paper basis weight in gsm (grams per square meter), as well as the caliper (thickness). Again, these settings (weight vs. caliper) are mutually exclusive as paper weight doesn’t necessarily correspond to paper thickness.
The caliper specs are usually specified in mils, but sometimes they are listed in mm (millimeters). To make matters even more confusing, data sheets from some paper manufacturers specify the paper thickness in inches or even micrometers (μm). We will make sense of this and go over how to translate these units.

Before we begin, please note that mils are not to be confused with millimeters (mm). A mil is much smaller than a millimeter (mm). One ‘mil’ (also called a ‘thou’) is equivalent to a thousandth of an inch (0.001 inches) and is a term used in engineering and manufacturing. One mil is equivalent to 0.0254 mm.
For Epson printer drivers the paper thickness is specified in tenths (0.1) of a millimeter (mm), although the advanced media control section of the driver dialog box displays whole numbers as I have demonstrated in screenshots. So a value of 3 is actually 0.3 mm.
CALCULATION TIPS: There are several conversion scenarios you may need depending on whether the paper caliper is specified in mils or mm:
If the caliper specs are supplied in millimeters (mm), simply multiply by ten and round up this value to the next highest whole number (e.g. 0.37 mm x 10 = 3.7 which is rounded up to 4). You would therefore enter the number 4 into the paper thickness setting box.
More often the caliper specs are supplied in mils. In this case, simply multiply the number of mils by 0.254 and round up this value to the next highest whole number.
The caliper specs may be listed in micrometers (μm) or microns. Since a micrometer is a thousandth of a millimeter, first divide by 1000 to get to millimeters. Then, as in scenario “A” above, multiply by ten and round up this value to the next highest whole number. Or, to make things even easier, just divide the micrometer value by 100 and round up.
Here is an example of a ‘mils to mm’ calculation for Breathing Color’s Elegance Velvet Paper. This paper has a caliper of 23 mils, according to the data sheet. Multiplying 23 x 0.254 equals 5.842. Round that up to the next whole number, 6, to calculate the Epson paper thickness setting. (Of course choosing 6 actually means 0.6mm per the Epson printer driver dialog box.)
Here is what the Epson 3880 driver dialog box looks like after the correct Paper Thickness setting of 6 is applied for Elegance Velvet paper:

As a general rule on Epson printers, thinner photo papers (using PK inks) such as glossy, luster and metallic use a thickness setting of 3; fiber-based baryta photo papers and thicker fine art matte papers use a paper thickness setting of 4–5; and the thickest cotton or canvas papers use a setting of 5–6. In contrast, plain paper would default to a thickness setting of 1 (0.1mm).
Additional Useful Driver Settings

Since there are so many makes and models of printers, it is beyond the scope of this article to cover advanced media settings for all scenarios. And they may or may not be available for your printer. Refer to your printer manual for more information on available options. These advanced options can vary widely even amongst various models produced by a single manufacturer.
Although I have addressed solutions to some common printing problems, there are additional advanced media settings that may also need to be configured. Some prosumer and all professional Epson printers have Advanced Media Control options available in the printer driver dialog box that enable the user to optimize settings for third-party papers. I have shown these on the Mac.
On Windows, these settings are accessed via the Paper Configuration button from the main tab in the Epson driver dialog box, although the terminology may vary depending on the printer model. As always, refer to your printer manual.
In addition to the Epson platen gap and paper thickness settings, users can adjust the paper feed adjustment time (how fast or slow the paper is advanced through the printer), color density percentages (applies more or less ink to the paper), drying time per print head pass (helps avoid ink smearing and banding), and paper suction (helps flatten the paper – available on pro printers only).
Experimentation with all these settings may be necessary to achieve optimal results. Of course, as is the case with all papers, making your own custom ICC profiles and tweaking the advanced settings for each paper will produce the best possible print for your situation.
Again, complete instructions for third party paper printing on Breathing Color papers – for Epson, Canon and HP, on Mac and Windows –can be found at: Support Tab > Print Instructions
On a final note, I hope this post will assist you in creating the perfect print. May the papers be with you!
Want to have this guide on hand for reference later on or to print at home? Click the below link to get the downloadable PDF version of this article!
For more great information from Renée Besta, the author of this series, check out her extensive guide to HDR photography.

Renée Besta is a fine art photographer and printer, digital imaging and graphics instructor, graphic designer, and exhibit producer who has been avidly engaged in the art form for over 35 years.
