

Tips to maximize your photo editing performance by optimizing your hardware – recommendations for storage options, displays, ergonomic seating, and more!
In part one of the series, I gave tips on how to have a productive image editing workflow by looking at components inside of your computer.
Now that you know internal areas that can be upgraded for you to have an efficient photo editing workflow, we will now look at everything outside of your computer.
This is another post with a lot of ground to cover, so if you’d like to download Parts 1 and 2 of this article to your computer to browse through at your own pace.
Once again, for those who have a tight budget, this article will help you identify where you should spend your money for maximum impact and efficiency.
Here we go.
Permanent Internal Storage Options
Permanent storage is where files are saved so that when we turn computers off and back on, the files are still there for us to use, unlike RAM, which empties out when computers are turned off.
We refer to this storage as the computer’s hard drive.

It takes good research to choose the best hard drive—not only do permanent storage choices come in different capacity sizes, but they’re made to run at different speeds, and they connect to computers at differing speeds.
Choosing the best permanent storage for image editing requires balancing the size of the drive, the internal speed of the drive and the speed of the drive’s connection to the computer with your available budget.
The faster your hard drive moves data in and out, the better your image editing workflow, so these speed choices are a major factor in workflow efficiency.
Surprisingly, it’s not as easy as you might think to find a clearinghouse for good hard drive testing results.
Some websites offer speed tests of various sorts, including Bare Feats, a site I highly recommend for finding great testing info.

Organization of this site is very modest, so you’ll have to do a site search for particular topics or products using the FreeFind search box in the upper right of the home page.
Fortunately, if you search the index for SSD, or for Thunderbolt, a large number of articles show, and you can see more detail in each listing’s summary to find the info most useful for you.
The site has a nice blend of detailed testing info and visual presentation (different-colored bars indicate fast, medium, slow), so you can indulge your inner geek or avoid geek-speak by using the graphs.
Many of the drives tested on this site are very fast indeed; some perhaps overkill for still image editing, vs. video storage and editing.
While you can also run speed tests yourself, using software such as the $14.95 Speed Tools Test Suite, which is used by Bare Feats, there’s not as much use in testing a drive you already own as in reading the results developed by someone else with access to many more drives for testing than most of us will ever have.
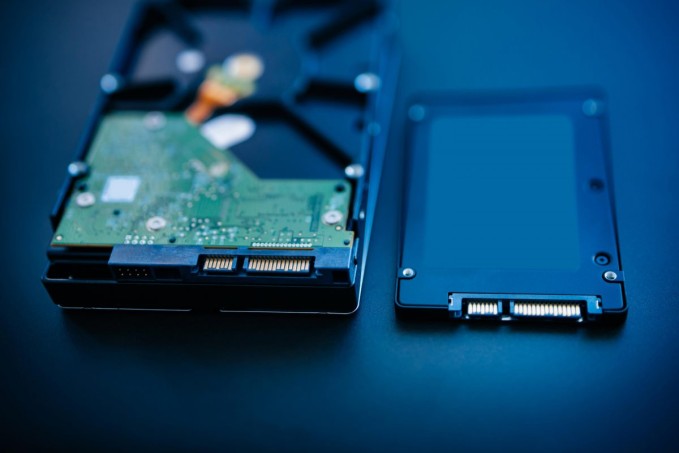
Three Types of Drives, and their Relative Speeds
In terms of the speed of the hard drive itself, current drives come in three distinct types:
Traditional hard drives have spinning platters, rotating at various speeds, faster being better.

SSD (solid-state drives) are made entirely of non-moving parts. Think of SSDs as a very large collection of memory chips which store things permanently and you won’t be far off. They’re much faster than spinning platters.

Finally, there are Hybrid drives, which use a combination of a small SSD for storing the most often needed part of a program or file, while using a traditional spinning platter hard drive for the bulk of regular storage.

This provides an improvement over the speed of traditional spinning platters while preserving the availability of the much larger storage capacity of traditional drives.
There are advantages and disadvantages for each type of drive. Cost per megabyte of storage, speed of connection to the computer and speed moving information in and out of storage while working are the top three considerations. Let’s look at each one.
Size vs. Price
Traditional hard drives continue to be made in bigger sizes; a large capacity hard drive may have several platters in it, to expand capacity.
As of this writing, it’s possible to find very large single hard drives, such as 8 terabytes in size, an amount of storage that was unimaginable years ago, and some drives pair 2 or more large drives together in one case for gigantic amounts of storage.
If you need this much storage, traditional hard drives will be the least expensive option when calculating cost per megabyte.
By contrast, SSDs will be much smaller in their maximum capacity (currently 4 terabytes maximum, though many things can change in a hurry in technology).
When comparing equivalent sizes and prices, I can put a 4 terabyte traditional drive in my Mac Pro silver tower for $199; if I want to put in an SSD of the same size, it’s $1,999.99!
Clearly, tradeoffs must be made…until the pace of technology drives prices of SSDs down closer to traditional drives for the same storage capacity.
Speed

The traditional hard drive is significantly slower than the next option, the SSD.
Both traditional drives and SSDs are rated at varying speeds; as you’d expect, the bigger the drive, and the faster it works, the more it costs.
Comparing Similar Drives for Reliability
When selecting a hard drive, after you decide what capacity you might like, such as a 3 TB drive at 7200 rpm, look to see its rated MTBF (mean time between failures).
A consumer level drive will have one number of hours between failures, a professional drive will usually have a higher number.
The higher the number, the better the chances that your hard drive will work longer without failing.
Note: This is not a guarantee! No matter how good the technology is, The First Rule of Hard Drives is still valid; “It’s not a question of IF your hard drive will fail, it’s simply a question of WHEN.”
Thus, your best workflow will include a very good backup drive as well.

Current SSDs offered are not available in sizes as big as the biggest traditional spinning drives, but they have two advantages traditional spinning drives lack.
They move data faster, usually much faster, and they have no moving parts.
As with traditional hard drives, SSDs are rated for certain period of time or certain length of years, after which you should plan to replace them proactively.
Did I mention they’re really fast?

Putting an SSD into a laptop can make an older machine dance with joy, making it feel new again.
It’s an amazing upgrade, and since the maximum size I can put in my laptop tops out at 2.0 terabytes, the price is not nearly as stratospheric as the 4 terabyte SSD upgrade ($2,000) mentioned above.
SSDs, having no moving parts, are solid upgrades in another way; they’re more rugged in laptops, resisting damage from shocks that might cripple traditional spinning hard drives.
Speed Distinctions
Who doesn’t like to go fast? Speed on hard drives is measured in various ways.
There’s the speed at which the disk spins, if it has a disc to spin; there’s the speed of the connection to the computer, such as the Lightning cable or USB cable, or the internal connector, such as SATA, and there’s the speed at which the hard drive handles various tasks, such as reading, writing or copying large or small files.
When these measurements are done, and ratings assigned, it’s pretty clear that some drives are faster in general than others, while some drives are faster only at specific tasks.

The speeds and feeds are controlled by a combination of how fast the drive can move the data because of the speed of the storage element itself, such as the chip or the spinning platter, as well as the controller that moves the data in and out of the drive.
Many people don’t think about how hard drives or other solid storage are made, but it’s a complex art, worthy of a great deal of respect—and it’s important to research the specifications and any available testing to find the best choice for your workflow.
Traditional spinning drives run at different speeds, and slower is definitely not better.
Knowing this, for example, you might decide not to order the new iMac 21” model with the traditional spinning drive in it, because it runs at 5400 rotations per minute (rpm), the slowest drive currently shipping in general use.

Why Apple chose to put this drive in this machine is baffling question, especially since it’s paired with such a beautiful display.
If you suspected that Apple wants you to upgrade to a better drive at extra cost, one using the hybrid technology they offer, I suspect you might be right.
If I were ordering this particular model, I don’t think I’d be happy with the slow-spinning traditional hard drive, so I’d definitely add the $100 for the faster drive.
Traditional hard drive speed ratings start at 5400 rpm, then 5900, jumping to 7200 rpm, then 10,000, then 15,000. The faster the rated RPM speed, the higher the cost will be per megabyte of storage, for same size drives.
Superfast spinning drives are overkill for most image editing workflows, but by all means, get something faster than 5900 whenever possible.
These drives are so much faster than traditional platter-drive that they take your breath away. Speeds increase regularly as technology advances.
For example, Seagate has just announced the fastest ever single SSD, capable of speeds up to 10GB/sec (10 gigabytes a second)—at least, the fastest for now.

Seagate’s new PCI-E 16x SSD: Image courtesy of Seagate
By comparison, most consumer SSDs move data at 500 MB/second. Does 20x faster sound desirable? You bet! The previous speed champ was a little over 6 GB/sec, so this is a nice advance.
SSDs can make an older machine feel young again, and speed up image editing considerably.
As they continue to be more expensive than traditional drives, some image editing professionals have compromised by having large traditional hard drives for permanent storage, but they have a SSD as their main editing drive.
This drive needs to be big enough to use it for editing a file, which, when finished editing, is transferred to permanent storage to make room for new files to be edited.
External Connection Speed
USB 2.0, USB 3.0, FireWire 400 and 800, Lightning, USB-C—you can find external drives connecting to your computer using a wide range of connection types.
Here’s a quick list to demystify the names and understand the different speeds available for you.

If you’re working on an older machine, you may not have the latest and fastest connections. Some of these can be made available by upgrading.
Adding a USB 3.0 card to a Windows desktop or a silver tower Mac Pro is fairly inexpensive and lets you take advantage of the current speed of USB 3.0 drives.
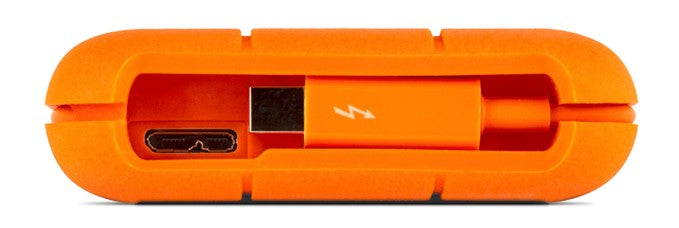
On the other hand, it’s not possible to add Thunderbolt connectivity to machines without Lightning ports.
In case you don’t know if you have a Lightning port, it should have an icon like the one shown on the LaCie drive below; the other port is a USB 3.0 port, which will also connect, albeit at slower speeds, to a USB 2.0 port on an older machine.
Scratch Disk
As mentioned above, a scratch disc is a disk area where Photoshop writes temporary files when it can’t do all its work in RAM.
When Photoshop is installed, by default it uses an area of the hard drive on which it’s installed, but power Photoshop users have known for a long time that having a separate designated scratch disk was a great way to improve your workflow.
It didn’t have to be huge, but until recently, it needed to be a separate drive for best results.
With the rise of SSDs as primary drives in many computers, this advice has changed.
If your computer uses a traditional hard drive, a separate drive, with lots of free space, defragmented, is still the best recommendation. If, on the other hand, you’re using an SSD as a primary drive, you should set the primary scratch disk to be the same primary SSD drive.
If you’re working on a machine that allows you to have a second internal drive, this is the best choice for a scratch disk, especially if you have two SSDs. If not, the scratch disk should be connected to your machine by the fastest possible connection.
On older machines, some high-end machines had faster connections such as eSATA. Others had FireWire ports.

Currently, connecting a USB 3.0 hard drive to a machine with USB 3.0 ports is a good start, and if your machine has a Lightning port, that’s even better.
Of course, hard drives that connect with USB are much less expensive, gigabyte for gigabyte, than Thunderbolt (Lightning port) hard drives are.
I wouldn’t spend the money for a Lightning drive solely to use it as a scratch disk, but as part of a workflow that both expands available storage and provides an external scratch disk, this would be a great option for machines that have Lightning ports.
Configuring your Scratch Disk
Once you’ve installed your separate drive, you need to tell Photoshop to take advantage of it.
To do so, open Photoshop’s Preferences to the Scratch Disks section. When you open this pane, you’ll see a screen listing all drives available to be a scratch disk.
In the screen shot below, none of the three drives checked are active drives. Check the disk you want to be the primary scratch disk, as shown.

Now, click on the up arrow at the far right of the pane, outlined in red, and move the primary scratch disk to the top, as shown below.
You can activate as many scratch disks as you’d like, and rank their priority so that when one disk is plugged in and another is not, whatever is plugged in becomes the primary scratch disk.
Photoshop supports up to 64 exabytes of scratch disk space on up to four volumes. (An exabyte equals 1 million terabytes.)
Needless to say, most of us won’t be plugging in that level of storage any time soon…

Scratch disks are one of the most important things you can manage for best results in Photoshop. Adobe advises:
- For best performance, scratch disks should be on a different drive than any large files you are editing.
- Scratch disks should be on a different drive than the one your operating system uses for virtual memory.
- RAID disks/disk arrays are good choices for dedicated scratch disk volumes.
- Drives with scratch disks should be defragmented regularly.
Other Preferences to Set for Optimal Performance
History States and Cache Levels

In the yellow outlined box are some odd names for History and Cache Settings, no? Tall and Thin? Big and Flat? What’s up with this?
These three settings offer different performance behaviors for different types of files. Tall and Thin refers to files that are not terribly big, but have lots and lots of layers (dozens to hundreds).
Use Big and Flat for files that are very large, but have very few layers. If your files have lots of layers and are very large, use the Default setting. Matching your type of files to these settings improves file handling efficiency.
By default, Photoshop saves 20 History States, though it can save up to 1,000. I use a higher number (50) when doing fine detail retouching, as shown in the screen shot.
This is because small areas of a file being adjusted, such as a pore or a blemish, don’t use a lot of memory.
A transformation applied to the whole image, by contrast, uses quite a lot. You can improve handling by decreasing the number of History States from 20 to a lower number. Photoshop uses caching to speed up handling of high-res images.

Increasing Cache Levels, shown in the Green box at right, will improve image handling and responsiveness once loaded, though a higher cache number will slow down the initial loading of images.
The maximum is 8; the default is 4. You can go down to 1, but it is definitely not recommended.
Displays
In an optimal workflow, you will have a great display, set up ergonomically, with no light striking the display to distort your perception of color, light or shadow.
You can see two previous posts here, which address how to set up an ergonomic workflow, and how to set up your display for great color. A third post can help you select an optimal display for your particular workflow needs.
Links to all three are:
- Hunched Over Laptop Syndrome – Tips for Artists Working at Desks
- Guide to the Perfect Color Workflow – Part 1: Dial In Your Display
- How to Choose the Right Display for Photo Editing

So much has been written on the topics of good displays, good lighting and good ergonomics that I’ll simply say that this is an area where you don’t want to skimp, because you can damage your eyes, or your body, or both.
That damage can be permanent, and an unhappy legacy of your quest to create great images.
Buy a good quality display, set it up so that you’re not causing eyestrain or neck strain, use a contemporary color calibration system and manage all lighting in the work area for best results.
Tablet / Stylii

I can’t imagine trying to do the quality or the volume of work that I do without a stylus.
For many people, the best way to use a drawing pen is to buy a Wacom tablet, available in a variety of sizes, from small to extra large.
Julieanne Kost, famous photographer and Photoshop evangelist, has often said that it is makes no more sense to try and retouch with a mouse that it does to try to do fine art sketching with a bar of soap.
She’s right; the speed and precision with which one works using a tablet with a stylus is something I can’t afford to be without.
Stylus technology is also available for use directly on a range of Wacom displays; not all of them support professional level color management, so choose wisely if you go that route.

Trackballs
Some Photoshop and Lightroom users swear by using a trackball, a device replacing or augmenting a mouse.
They argue a case for these devices by saying that users find they can be much better for your wrist than holding a standard mouse, which is often true.
The second argument for some trackballs is that those with customizable buttons, such as the four button model above, can be configured with presets that speed up the workflow, using various combinations of preprogrammed settings that can be very quick to use, and very helpful.

It’s important to find a trackball that allows you to keep your wrist straight, so that you don’t make any stress on your wrist worse when changing to a trackball from a mouse.
Try before you buy, and when possible, purchase from a dealer that will work with you to find the best fit, and allow you to return items that don’t work for you.
Note that programmable buttons are also incorporated into some tablets and displays; I use both every day.
Ergonomic Seating
I recently wrote a blog post detailing what happens to people who don’t pay attention to ergonomics, using myself as the prime example of someone who did not do the right thing and paid the price.
Months after neglecting well-established principles of ergonomics, my neck and shoulders are still troubling me, and I must be hyper-careful about how I hold my head, how I sit in my chair, and in general, how I move and work.
While it’s tempting to dismiss the fuss over ergonomics as a way to sell expensive furniture and fuss over small, seemingly unimportant details, in truth it’s critical to pay attention to these factors and manage them carefully. I’m living proof!

Foot support
Part of good ergonomics is support for your feet when you’re working at a desk.
This may sound silly, but recent studies and personal experience have shown that elevating your feet off the floor while you’re working at your desk retouching or editing for long periods of time is beneficial to your body.
You can get a fancy footrest, such as the one shown in the photo above and below, but if you don’t feel like spending the money on something fancy, improvise with something you already have around the house. You’ll be glad you did.

Last, and Most Important—Backing Up your Work
The First Rule of Hard Drives is that they will all eventually fail, and you must be prepared when they do. This means you MUST have a good backup system in place, always.
Being a belt and suspender man myself, I believe in having multiple backups, one being offsite.
After all, fire, theft and flood will affect anything onsite, including the backup drive sitting right next to your computer, no? More on backing up in another blog post.

In Summary: My Recommendations
I know it’s easy for me to write expensive advice to help you spend a lot of money to set up a perfect system, and yet I’m very mindful of the cost of all these recommendations.
We all have to live within our budgets, and have to be realistic about how we work and what we do. So, let me suggest some priorities for building or improving workflows.

If you find you are waiting prodigious amounts of time for any particular function to execute when editing images, that’s a sure bet that a change and/or an upgrade is in order.
Either your files are too large for your system, your software settings are not optimized, or parts of your system are too slow. Either way, it’s frustrating and unproductive.
Here are some details and some trade-offs that I recommend you consider when deciding how to address bottlenecks in your workflow.
For an Existing Computer Workflow
Before anything else, check your settings for Photoshop to make sure you’ve optimized all your software defaults. If that doesn’t solve slowdown problems, do the following steps, one at a time, to speed up your workflow:
- Add more RAM.
- Get a bigger AND faster hard drive, which will allow at least 20% empty space on your hard drive when working.
- Upgrade your GPU’s driver to most current version.
- Upgrade your GPU, when possible and it will make a significant improvement.
- Improve your input devices, by adding a stylus, or a trackball, or both.
- Add ergonomic seating and desk arrangements.

When Shopping For a New Computer
These steps are best:
- Choose an i7 chip, but when offered a choice of speeds, get the less than top-of-the-line CPU, and put the extra money saved into a better graphics card, and particularly, more RAM.
- If buying a computer that only offers RAM hardwired to the motherboard, buy all the RAM you can get at the time of purchase.
- If RAM is interchangeable, compare buying RAM cost from the manufacturer vs. buying the minimum amount and adding in more later from a third-party. Pick the option that lets you maximize your RAM.
- Ask your store or dealer to show you ways to optimize your purchase.
- Get the best price for things like additional memory and a bigger/faster hard drive.
- Get the fastest hard drive you can.
- Get the biggest color gamut display (as close to 100 AdobeRGB gamut as possible).
Conclusion
Optimizing your computer for photo editing is not a cheap date, but you’re worth it. Expect to spend a significant amount of money, whether you’re making the initial investment, or augmenting things down the road.
However, it’s well worth the investment, both in terms of how you feel when you’re working, both physically and mentally, as well as the improved efficiency and better quality that comes with working with the right tools.
Here’s to great workflows.


Kevin O’Connor helps design and test software, is a graphic designer and photographer for multiple clients and companies, and fixes people’s (and companies’) color.
He has consulted to multiple companies, including Apple, Sony, Fujifilm USA, and X-Rite. He loves teaching good color practices to enthusiastic learners.
